Parted Magic Secure Erase
ATA, NVMe, SCSI, and eMMC/SD Drive Secure Erase Utility
Parted Magic Secure Erase is a hardware-based secure erase and data sanitization tool designed to completely delete all information stored on ATA, NVMe, SAS/SCSI, and eMMC/SD devices. Organizations involved in retiring ATA, NVMe, and SAS/SCSI drives will be able to securely destroy their data and meet the requirements of the NIST SP 800-88r2 Purge level. Each drive erased with Parted Magic’s Secure Erase receives a signed PDF certificate documenting the completion of the secure erase. Parted Magic also includes a PM Report Server that allows remote monitoring of the progress and evidence produced during the erase. Every session can be exported as a cryptographically signed evidence pack that anyone can verify offline (see Network Reporting and Signed Evidence Packs below). download Parted Magic and create a USB boot stick to start using Parted Magic’s Secure Erase.
Independently examined. An experienced senior digital forensics expert at a European national laboratory has been using Parted Magic Secure Erase for many years. After using Secure Erase, he examined the erased drives with X-Ways Forensics, and at the hardware level with an Atola Insight DiskSense 2 imaging device. The Atola Insight DiskSense 2 can read below the user-addressable area of a drive (service tracks and the firmware registry), which allowed him to confirm that the data was erased.
Secure Erase Video Walkthrough
This 25-minute video tour shows every feature on real drives. It shows how to erase four drives at once with ATA Sanitize, Enhanced Secure Erase, NVMe Sanitize, and Block Wipe. It covers how to handle frozen drives and how to choose between methods. It shows how to verify that the erase worked, what the certificate contains, and the physical destruction certificate. Finally, it shows the PM Report Server and its signed evidence packs, the terminal version, unattended erasing, and what happens when a drive’s own erase fails. The full chapter list for this video tour is on YouTube.
Secure Erase Overview
The Erase utility uses the drive’s own hardware erase command to permanently remove all data on ATA (SATA), NVMe, SCSI (SAS), and eMMC drives. Because the command is carried out by the drive’s own controller (unlike software wipe tools, which simply overwrite data from the operating system), every storage cell is wiped, including remapped sectors and areas the operating system cannot see. Even forensic equipment cannot recover the data afterward.
The erase utility follows NIST SP 800-88r2 (September 2025), and the specific erase techniques comply with IEEE 2883.
Supported Secure Erase Paths
Nine different erase paths are built into the erase utility. Based on the capabilities of each drive, one path is selected automatically. A tenth, TCG Opal Cryptographic Erase, takes over when a self-encrypting drive refuses its own erase command:
| Erase Path | Description |
|---|---|
| ATA Sanitize | Drives that support the ATA Sanitize feature set; this is the preferred method. Block Erase (hdparm --sanitize-block-erase) is selected where the drive advertises it, as most SATA SSDs do. Overwrite is used on drives that advertise only Overwrite, as most hard disks do. Overwrite and Crypto Scramble can be selected per drive where advertised (see Per-Drive Sanitize Method Selection). |
| ATA Secure Erase | Fallback for drives without Sanitize support. It uses hdparm --security-erase (standard) or --security-erase-enhanced (Enhanced Secure Erase) where available. Drives locked by an ATA password (usually left behind by an interrupted Secure Erase, which sets the password pmagic) are listed here with a LOCKED badge and erased with that same password. |
| NVMe Sanitize | NVMe drives capable of Sanitize (sanicap bit 1). It defaults to nvme sanitize --sanact=2 (Block Erase); Overwrite and Crypto Erase can be selected per drive where advertised. |
| NVMe Format | Fallback for NVMe drives lacking Sanitize support. It defaults to nvme format --ses=1 (User Data Erase). Crypto Erase (--ses=2) is optional and falls back to --ses=1 if the firmware rejects it. |
| SCSI Sanitize | SAS/SCSI drives that advertise the Sanitize Block Erase service action, which is checked with REPORT SUPPORTED OPERATION CODES. It uses sg_sanitize --block. Drives that also advertise Overwrite or Crypto Erase can have either selected per drive. Block Erase is the entry condition: a drive advertising only Overwrite or Crypto Erase goes to SCSI Format instead, which is the usual case for SAS hard disks. |
| SCSI Format | Fallback for SAS/SCSI drives that do not advertise Sanitize Block Erase. In practice this is most SAS hard disks. It uses sg_format --format (Format Unit). Format Unit takes a long time on large enterprise drives: about twelve hours on a 4 TB SAS drive. Drives reporting a non-standard sector size (520, 528, 4160 or 4224 bytes, typical of drives taken from storage arrays) are routed here on purpose, because Format Unit sanitizes the drive and restores a standard sector size in one operation, while Sanitize would wipe the media and leave the drive unusable. |
| eMMC / SD Erase | All eMMC cards are seen as /dev/mmcblkN. Cards that support Sanitize (bit 6 of SEC_FEATURE_SUPPORT in their Extended CSD register) get a full user area erase followed by Sanitize, which physically deletes the information in all unmapped blocks, as the eMMC specification has recommended since version 4.51. Older cards that only have Secure Erase (bit 0) get that command. Parted Magic uses mmc erase and mmc sanitize. Cards that have neither, and all SD cards (SD has no Extended CSD), are wiped with Block Wipe instead. |
| PSID Revert | Locked self-encrypting drives (see Secure Erase Drive Groups below). If a drive is also locked by an ATA password, Parted Magic first tries pmagic, the password left by an interrupted Parted Magic Secure Erase, which requires no PSID. Otherwise Parted Magic uses sedutil-cli --PSIDrevert with the 32-character Physical Security ID shown on the drive label, given with --psid-code or in the drive’s PSID field on the selection screen. The revert cryptographically erases and unlocks the drive, and Parted Magic then erases the drive again with the best method its firmware now advertises. So the NIST level comes from that second erase. |
| TCG Opal Cryptographic Erase | Not chosen up front: if a TCG Opal self-encrypting drive refuses its own hardware erase, the utility takes control of the drive’s encryption and resets it. This generates a new media key, making everything written before unreadable. It meets NIST SP 800-88r2 Purge in less than one second. See When a Drive Refuses the Hardware Erase. |
| Block Wipe | Software fallback for drives that have no hardware erase command, including USB flash drives, legacy drives, SD cards, and eMMC cards with neither Sanitize nor Secure Erase. The utility uses dd, which meets NIST SP 800-88r2 Clear (standard write interface). It can take many hours on a large drive. A drive with a hardware erase can be switched to Block Wipe too, for a drive whose own erase left data behind: use the Block Wipe check box on the drive’s card, m in the terminal, or --block-wipe DEV. |
Hidden Area Coverage (HPA / DCO)
ATA drives can reserve space that the operating system cannot see, using two methods: Host Protected Area (HPA) and Device Configuration Overlay (DCO). Data in these reserved spaces can survive a normal format or partition delete.
The hardware erases cover them. ATA Sanitize and ATA Secure Erase are firmware-based commands. Parted Magic issues them without changing the drive’s limit, exactly as a direct hdparm command would. On a drive with the accessible-max feature, the ATA standard defines their range as the drive’s entire native capacity, which includes the sectors above the limit. Drives with an older-style HPA from three manufacturers were tested directly: after a Secure Erase, the sectors that had been hidden read back erased.
Block Wipe is different because it writes through the standard interface and only reaches the space the drive exposes. Before a block wipe of an ATA drive, Parted Magic opens an HPA or DCO where the drive allows it. The HPA reset is volatile and reverts the next time the drive powers down. A DCO restore is a persistent factory reset. Either way the wipe runs, and the number of sectors the overwrite covered is recorded in the Advanced Log’s Hidden Area line.
If the drive will not lift its limit (behind a USB bridge, for example), those sectors stay outside the reach of any overwrite. To get the most security from a drive that may have hidden areas, connect it to a native SATA/PATA port and let a hardware erase (Sanitize or Secure Erase) handle the hidden areas.
Parted Magic also includes hdparm, so you can examine the hidden areas of a drive yourself before or after an erase:
# Check for HPA (compare "native max" vs "accessible" sectors):
hdparm -N /dev/sdX

# Check for a DCO:
hdparm --dco-identify /dev/sdX
⚠ Warning: Data Loss
THIS OPERATION IS PERMANENT AND CANNOT BE UNDONE.
Once an erase begins, it cannot be stopped or reversed. The utility completely destroys all data on the selected drives, and it cannot be recovered. Make certain that you have selected the correct drives before confirming.
Do not shut down, power off, reboot or sleep the computer while an erase is running.
Step 1: Secure Erase Drive Selection
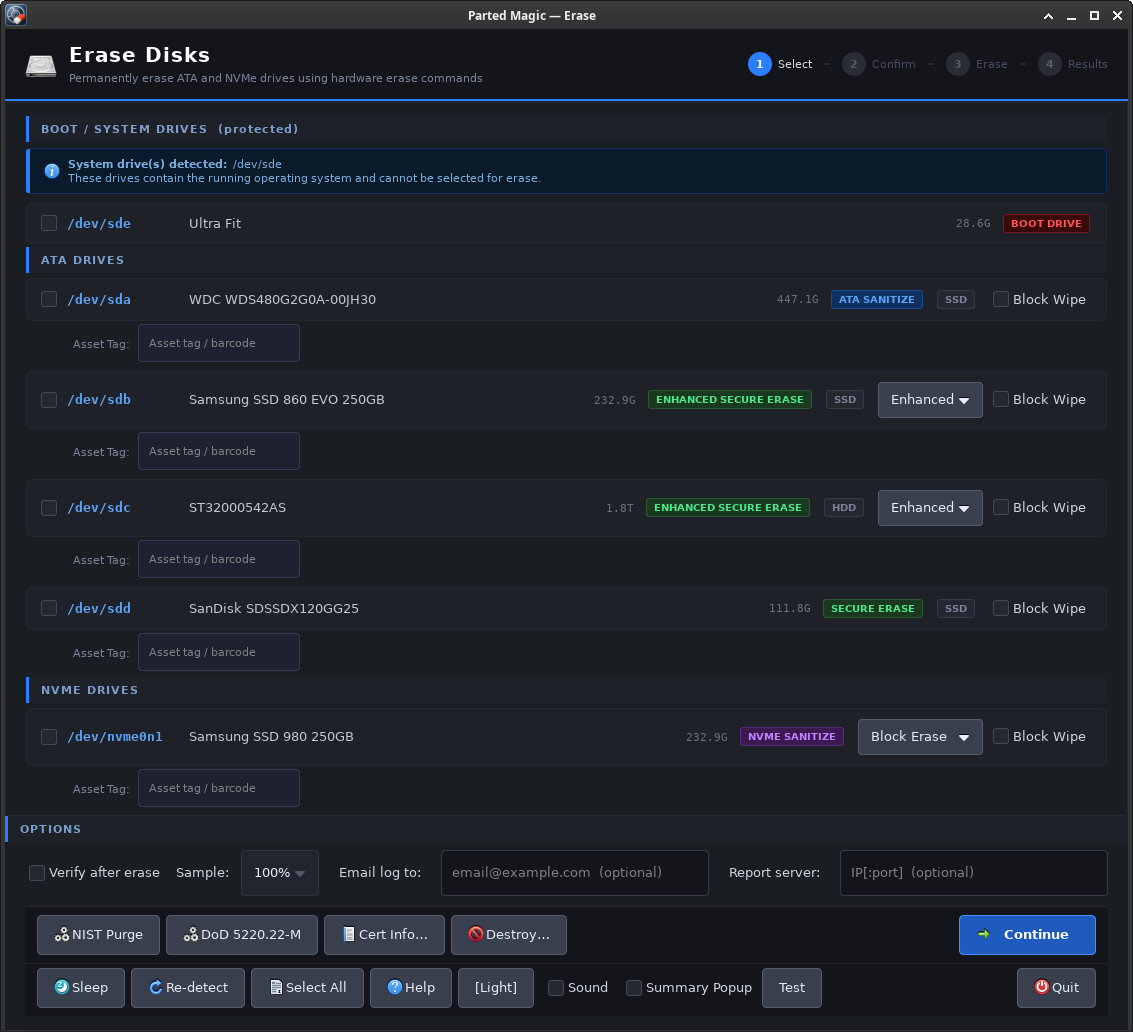
The application detects drives automatically when launched. All detected drives are grouped by type of erase. On launch, the utility selects no drives. The user checks each drive they want to erase. In TUI mode, users may press a to mark all eligible drives for erasing, or use --select on the command line to pre-mark certain drives.
Secure Erase Drive Groups
| Group | Contents |
|---|---|
| ATA Drives | This group holds ATA Sanitize drives and ATA Secure Erase drives. Drives marked FROZEN will display within this group; however, a frozen drive cannot be selected until it is unfrozen (see Sleep below). |
| NVMe Drives | NVMe Sanitize and NVMe Format drives. |
| eMMC / SD Drives | This group holds eMMC cards (/dev/mmcblkN) that support Sanitize or Secure Erase. All other types of cards (including SD cards) appear in Block Wipe. |
| SCSI / SAS Drives | SCSI Sanitize and SCSI Format drives. |
| Locked Drives — PSID Revert | Self-encrypting drives that have been locked by their own encryption through TCG Opal, which is how encryption software leaves them (such a drive stops reporting the ATA security feature), or by an ATA password on a drive which continues to report itself as self-encrypting while locked. See PSID Revert above. A drive locked by an ATA password that does not report itself as self-encrypting while locked (such as a Samsung 860 EVO), or any locked drive that is not self-encrypting, will appear as LOCKED in the ATA Drives group instead. |
| Block Wipe | Hidden by default. Users must click “Show Block Wipe” in the Options bar to make visible the section for drives without supported hardware erase capabilities. This section only displays if the utility finds drives without supported hardware erase capabilities. Click “Hide Block Wipe” to collapse the section again. |
Each drive card lists the device path, model name, capacity, and erase method badge. When a user hovers over a card, they are able to view the full serial number, NIST level, and the exact erase command the utility will execute. Empty card readers or other removable media slots with no media inserted into the slot do not appear at all and thus will never be shown as zero-byte targets.
Secure Erase Badge Colors
| Badge | Color | Meaning |
|---|---|---|
| ATA SANITIZE | Blue | ATA Sanitize Block Erase |
| SECURE ERASE | Green | ATA Security Erase |
| ENHANCED SECURE ERASE | Green | ATA Enhanced Security Erase |
| NVME SANITIZE | Purple | NVMe Sanitize Block Erase |
| NVME FORMAT | Orange | NVMe Format, for NVMe drives without Sanitize |
| MMC ERASE | Cyan | eMMC Sanitize or Secure Erase |
| SCSI SANITIZE | Green | SAS/SCSI Sanitize Block Erase |
| SCSI FORMAT | Light Green | SAS/SCSI Format Unit fallback |
| PSID REVERT | Magenta | Locked SED: PSID revert |
| BLOCK WIPE | Violet | Software wipe (dd) |
| LOCKED | Red | Drive is locked using an ATA password. The drive is erased using pmagic, the password left behind by an interrupted Secure Erase. If the drive rejects that password, then nothing will be written and there will be an entry in the record explaining how to remove the owner’s password |
| SID BLOCKED | Red | TCG SID authentication has been blocked by the platform firmware. Therefore, the TCG cryptographic erase cannot run on this drive. Some NVMe firmware also refuses the Format erase while the SID block is set. This is only a warning and does not stop the erase. Where the firmware supports it, the utility can ask for the SID block to be lifted at the next boot. See TCG Block SID and NVMe Format. |
| BOOT DRIVE | Red | System drive or boot medium, cannot be erased |
| MOUNTED | Yellow | Drive has mounted partitions |
| FROZEN | Red | Drive is frozen; must unfreeze |
| HDD / SSD | Grey | Drive media type |
| SANITIZE RUNNING | Red | An ATA Sanitize erase from a previous session is still running inside the drive; let it finish before attempting another erase |
| RAID LUN | Violet | RAID logical volume: the controller hides the physical drives, so only a block wipe is possible. Set the controller to pass-through (HBA, IT or JBOD) mode for a per-drive Purge |
| VIRTUAL DISK | Violet | A hypervisor’s virtual disk; block wipe only |
| 520B SECTORS (etc.) | Yellow | SAS drive formatted with storage array sectors (520, 524, 528 bytes or 4160 and 4224 bytes): the Format Unit erase reformats it back to 512 or 4096 bytes for normal use |
| TCG CRYPTO ERASE | Teal | Results screen: the drive refused its own erase command and was erased by TCG Opal cryptographic erase instead |
BOOT DRIVE: the utility protects the medium you booted from as well as the drive used by the running system. Even after a copy-to-RAM boot, where the USB stick is unmounted and would normally look like any other removable media, the utility identifies it based on which device the system actually booted from rather than what is currently mounted. A drive plugged in later that happens to take the old device name of the stick will still be offered for erase.
Per-Drive Sanitize Method Selection
Drives in the Sanitize classes may advertise more than one Sanitize sub-command. When they do, their card displays a drop-down menu so the user can choose a method per drive. In TUI mode, highlight the drive, then press m. The defaults keep the long-standing behavior: the utility prefers Block Erase everywhere, and runs cryptographic methods only when they are selected on a drive that advertises them:
| Drive Class | Selectable Methods | Default |
|---|---|---|
| ATA Sanitize | Block Erase, Overwrite (1-pass zeros), Crypto Scramble | Block Erase |
| NVMe Sanitize | Block Erase, Overwrite, Crypto Erase | Block Erase |
| SCSI Sanitize | Block Erase, Overwrite, Crypto Erase (the drive must advertise Block Erase support to reach this class at all) | Block Erase |
| NVMe Format | User Data Erase (-s 1), Crypto Erase (-s 2, opt-in) | User Data Erase. A failed -s 2 automatically falls back to -s 1. |
| ATA Secure Erase | Enhanced, Standard (per-drive combo where both are supported) | Enhanced where the drive supports it |
The selected method will display on the drive card, in the logs and on the certificate. Depending upon what type of erase operation is being performed, post-erase verification adjusts automatically. For example, since cryptographic methods produce indeterminate ciphertext, the verifier will switch to a readability check on those drives (and thus not perform a zeros check). Using the command line interface, users may specify a particular method to use across all eligible drives at once with --sanitize-method and --se-method (see Secure Erase Command-Line Options).
The utility sends SCSI Sanitize with the immediate bit set. Then the utility monitors the drive until it indicates completion. However, some SAS drives complete their task without ever indicating it. Therefore, if the drive answers TEST UNIT READY while its progress report stays the same for two minutes (either none at all or a figure that remains constant), the utility assumes it has completed. The utility will record SANITIZE_TIMEOUT in the log and then confirm the result of the erase by reading from the media itself (RESULT_CONFIRMED_BY=media-sample). A drive that is still working refuses TEST UNIT READY or continues to update its progress indicator, so it is considered still operational and is never interrupted, regardless of the length of time required. An unreported crypto sanitize is reported as failed rather than assumed successful, since ciphertext cannot be confirmed by reading it.
Upon completing the execution of a SCSI Sanitize or Format Unit command, the utility then queries the drive as to whether it executed successfully or not. To do this, it attempts to read the first sector of the drive. If the sanitize or format did not execute successfully, the drive will include that failure information within its response to the read request. That drive is then reported as having failed rather than passed certification. The window, terminal interface and unattended mode all query drives about the result in exactly the same manner.
Block Wipe Methods
In normal mode, users are presented with a drop-down menu on their Block Wipe cards allowing them to choose how they wish to wipe their drives. In NIST Purge mode, the method is locked to 3-pass dd (zeros/random/zeros), so the drop-down menu does not appear in that mode.
| Method | Passes | Description |
|---|---|---|
| Zero Fill | 1 | All zeros (fast, default) |
| Random Fill | 1 | Pseudorandom data |
| RCMP TSSIT OPS-II | 8 | Alternating passes (RCMP standard) |
| DoD Short (3-pass) | 3 | Zeros, random, zeros |
| DoD 5220.22-M | 7 | DoD 5220.22-M standard |
| Gutmann | 35 | Gutmann method (very slow) |
| PRNG Stream | 1 | Isaac PRNG stream |
Note: Section 3.1.1 of NIST SP 800-88r2 confirms that one pass of overwrite provides sufficient assurance for Clear. Multi-pass schemes such as DoD 5220.22-M or Gutmann provide no additional assurance on today’s media; DoD eliminated overwrite specifications from NISPOM in 2006, and Gutmann was developed for 1990s magnetic media. Thus, if users select Gutmann for an SSD or eMMC drive, the utility displays a caution notice, since Gutmann provides no security advantage over a single-pass wipe of flash media.
Asset Tags
Below each drive card is a small “Asset Tag” field where users should enter the IT asset tag, barcode or inventory number for that drive. The utility will print the asset tag in the drive’s record block on its certificate. These asset tags are retained for only the duration of each session and are not retained across multiple sessions.
Secure Erase Options
| Option | Description |
|---|---|
| Verify after erase | Runs the built-in post-erase read-back verifier on all erased drives. This feature is always turned on in NIST Purge mode. See Post-Erase Verification below for additional detail. |
| Sample | Specify the percentage of each drive to verify (10% to 100%). At 100%, the utility will read every sector. The default is 100%. |
| Show / Hide Block Wipe | Toggles the Block Wipe drives section on or off. It appears in the Options bar only when there are block-wipe drives. |
| Email log to | If the user enters an email address, the utility will send all log files and certificates on completion via mailx. The utility will save the entered email address to ~/.config/email and fill it into the email field on the next launch. |
| Report server | If the user enters a server address, live status, logs and certificates will stream to a PM Report Server on the network during the erase process (see Network Reporting below). The utility will save the entered server address to ~/.config/report_server and fill it in when next launched. The utility will use whatever server is in this field when it begins the erase. Leaving this field empty disables reporting. In the TUI, the same field is on the Cert Info screen (c). |
Secure Erase Action Bar, Row 1: Compliance and Workflow
| Button | Description |
|---|---|
| NIST SP 800-88r2 (Purge) | Toggles NIST SP 800-88r2 Purge compliance mode on or off. When it is on, verification is forced on, block wipe uses a fixed 3-pass dd, and all certificates record “Purge” as the standard. Turning NIST mode on turns DoD mode off. The setting is stored in /tmp/nist_purge_mode. |
| DoD 5220.22-M | Toggles DoD 5220.22-M certificate compliance mode on or off. Certificates are then labeled “DoD 5220.22-M” as the sanitization standard. Note: this only labels the certificates and does not change which erase commands run. Turning DoD mode on turns NIST mode off. The setting is stored in /tmp/dod_mode. |
| Certificate Info… | Opens a popover where the user can enter the organization name, location, phone number, work order number, media destination, data backup status, and chain-of-custody names and titles (technician, validator and witness). All entries made here are stored in ~/.config/cert_info.json. |
| Destroy… | Opens the Physical Destruction workflow (see Physical Destruction Logging below). |
| Continue | Advances to the Confirmation screen. Also saves all preferences to ~/.config/cert_info.json. |
Action Bar, Row 2: Utility and Notifications
| Button | Description |
|---|---|
| Sleep | This suspends your system to RAM for approximately 5 seconds and restarts the app. It’s best to use this option when an ATA drive is frozen. Most drives unfreeze after a power cycle. |
| Re-detect Drives | Runs the drive detection again without restarting the app. Automatically deselects any selected drives that have been removed from the system. |
| Help | Opens the built-in manual. |
| [Light] / [Dark] | Toggles between dark and light theme. |
| Sound | Plays a completion chime when all drives finish erasing. |
| Summary Popup | Shows a pass/fail summary dialog on completion. |
| Test | Previews the success chime. |
| Quit | Saves all preferences and exits the application. |
Step 2: Secure Erase Confirmation
This screen lists all of the drives that were selected to be erased along with their serial number, size, erase method, and compliance level. Be sure to review this list prior to proceeding.
SMART Health Gate
Once the confirmation screen opens, a SMART health check will run in the background on all of the selected drives (smartctl -H and -A). The check covers two different conditions:
Health Failures
If any of the drives report SMART FAILED, a red danger box will appear with the names of the affected drives. A second override checkbox will also appear: “I understand these drives are failing — proceed anyway and attempt erase.” The Start Erase button will remain locked until you check off both the consent checkbox and the SMART override checkbox.
Drive Temperature
The utility reads the temperature from SMART attribute 190 or 194 on ATA drives, the Current Drive Temperature line on SAS drives, or the NVMe Temperature field:
| Threshold | Severity | Behavior |
|---|---|---|
| ≥ 50 °C | Amber advisory | Shown, but does not block the erase. Better airflow is recommended. |
| ≥ 60 °C | Red danger box: CRITICAL | You’ll need to check off a second override checkbox before the Start Erase button becomes active. This is because erasing at extreme temperatures risks firmware damage and incomplete data destruction. |
A reading at or above 50 °C is taken again a second later and the lower value is kept, so a one-sample spike raises no alarm. An NVMe drive’s temperature warning counts as heat here rather than as a SMART health failure.
The utility records the temperature at the time of erase in the log (TEMP: field) and prints it on each drive’s certificate.
Consent Checkbox
The Start Erase button will remain locked until you check the consent checkbox: “I understand that all data on the selected drives will be permanently and irreversibly destroyed.”
There are three buttons on the confirmation screen: Back (returns to drive selection without erasing), Quit (exits the application), and Start Erase (begins erasing all of the selected drives simultaneously).
Step 3: Secure Erase Progress
When the erase begins, a status card appears for every drive being erased. Regardless of erase type (ATA, NVMe, SCSI, eMMC and Block Wipe drives), all drive erases will occur simultaneously. The progress bar and status message will update in real time.
| Status | Meaning |
|---|---|
| Spinning / Erasing… | Drive erase is in progress |
| Verifying… | Erase complete; the read-back verifier is running |
| Finalizing… | Writing logs, certificates, and final reports |
| ✓ Done | Drive erased successfully |
| ✗ Failed | Erase command returned an error |
Cards for block wipes show live progress: completion percentage, estimated time remaining and the current pass (for example, “pass 2/3 — random”). The utility calculates the ETA from the current write rate and hides it for the first second of each pass while the rate settles.
Hardware erases that report progress also show their own progress: a Sanitize shows the percentage the drive reports, and a SCSI Format Unit shows its own percentage, updated once a minute. An ATA or NVMe Sanitize that is still making progress is waited upon until it completes, however long it takes; only two hours without any change is treated as a hang.
If you have configured a Report server, the utility will announce the session to it immediately when the erase begins (machine identity and full list of drives), then send a heartbeat every 30 seconds and report each drive as soon as it finishes, whether successful or not. See Network Reporting below.
If verification is enabled, after all of the erases complete, the window switches over to the verification phase. The next section explains how this works.
Stopping a Drive That Will Not Finish
At times a drive gets stuck in uninterruptible I/O where no timeout can reach it, leaving its erase thread stranded. Before drives could be dropped, the only way out was a reboot, which lost the logs and certificates of every other drive in the batch because Parted Magic runs from RAM. Now each drive listed on the erase screen has a Drop button, and the terminal interface has the d key.
Dropping a drive stops the session from waiting for that one drive and allows the rest of the batch to finish normally, with each other drive getting its log and certificate. The dropped drive will be recorded as Erase Abandoned along with the phase it was in, how far through it went and how long it ran. Its certificate will state:
NIST SP 800-88r2: NOT ACHIEVED (the erase was abandoned before it
finished; the state of this drive's media is unknown)
Dropping a drive does not erase it and does not declare it clean. Its Sanitization Method shows Not completed, verification does not read it back, and it does not use the block-wipe fallback mentioned below. The drive will need to be erased again on a machine where it responds.
The confirmation dialog also allows you to remove the kernel device (the same as echo 1 > /sys/block/<dev>/device/delete), which causes the stuck I/O to fail so the thread can finish. By default this option is off, because it gives up the last remaining handle on a drive whose firmware erase may still be running.
Post-Erase Verification
If the Verify after erase checkbox is selected (or NIST Purge mode turns it on), then the verifier will run on each of the erased drives after all erase commands have finished. Verification is built into the Erase utility, so there is no additional software to install or set up.
The Verification Result Line
Each log and each certificate includes a Verification Result line indicating what the verifier actually performed, as opposed to simply saying pass or fail. Along with the result, it documents how many bytes were read back from the media compared to the drive’s full size, the distribution of samples across the media, which check was used, any temporary read errors that were cleared by a re-read, and both the elapsed time and the overall throughput. For example:
Verification Result: PASSED — 400,000,000,000 of 4,000,787,030,016 bytes
read back, 10% sampled across the full LBA range; zeros check; 0h 45m 12s
at 146 MB/s
An auditor reviewing a certificate can determine how far into the media the check went, along with its verdict. If a verification fails or is interrupted, it records how many of the planned bytes were read before it ended, and refers to the Verification Detail line of the log.
Besides documenting which check was applied, the same line also states what the medium actually held:
readback was all zeros
readback was a uniform 0x<nn> fill
readback was a repeating <bytes> fill
readback was not uniform
This is most important for solid-state drives. After a cryptographic method, these drives are checked only for readability and are never tested for a uniform pattern, since a cryptographic erase leaves indeterminate ciphertext and a pattern check would fail a perfectly good drive. This line tells you what such a drive actually did, without you having to hexdump it yourself. Not uniform is the expected answer after a crypto erase; on a drive that you expected to be zeroed, it is worth a second look. A repeating fill is a drive’s own wipe pattern of more than one byte, such as Seagate’s 33 cc 55 aa after an Enhanced Secure Erase. The line states the character of the data only when the pass covered everything it planned to cover; otherwise it cannot describe the whole drive.
If the readback finds surviving data, the line provides information about where the first of it is, and identifies the final sector as such when that is where it is. This type of information can be beneficial since certain drive firmware reports a clean sanitize yet leaves exactly that one sector un-erased, which looks nothing like a drive that ignored the erase entirely:
Verification Result: MISMATCH — surviving data in the FINAL sector of
the medium (byte 1,000,204,885,504 of 1,000,204,886,016; every sector
before it verified clean)
Drives Linux Cannot Address
A drive formatted for a storage array using 520 or 528 byte sectors appears to Linux as containing 0 bytes. A SAS drive formatted this way is reformatted to 512 byte sectors by the SCSI Format class. A SATA drive keeps its format, but its firmware erase still runs, and the verifier then reads it in its own sector size with SCSI READ(16); the Verification Result line says so, and the capacity is taken from the drive itself. A block wipe goes through the kernel and cannot reach such a drive, so it will be recorded as failed, with the reason.
Secure Erase Verification Modes
The verifier selects what check mode is performed on each drive based upon the actual erase method run on that drive. There are five different types of checks. A zeros check verifies that every sampled sector has been completely filled with zero bytes. After a block erase, the verifier uses an erased check. If this was done correctly, then each sampled sector should be in a state of being either all 0x00 or all 0xFF. These are the two possible states that a sector of flash memory can be in after it has been erased. The third type of check is a pattern check, which requires a single uniform fill, whatever byte the drive’s firmware happened to choose. The fourth type of check is a readability check. After any cryptographic erase, the encryption key no longer exists, so the contents of the drive are indeterminate. Therefore, the verifier performs a readability check to confirm only that each sampled sector reads successfully without returning an I/O error. The fifth type of check is a fill or readability check. It is used after an SSD’s Enhanced Secure Erase, which can take the form of either a fill or a cryptographic erase, and the first sector decides which. If the first sector reads back as one byte repeated, then every sampled sector must have that same fill. Thus, a partial fill will fail. Otherwise, the drive gets the readability check.
Check Modes by Secure Erase Method
| Erase Method | Check Mode | What It Verifies |
|---|---|---|
| ATA Sanitize (Block Erase) | Erased check | Every sampled sector is all 0x00 or all 0xFF. |
| ATA Sanitize (Overwrite) | Zeros check | Every sampled sector contains all-zero bytes. |
| ATA Sanitize (Crypto Scramble) | Readability check | Every sampled sector returns data without I/O error. |
| ATA Secure Erase (standard) | Zeros check | Every sampled sector contains all-zero bytes. |
| ATA Enhanced Secure Erase (hard disk) | Pattern check | Each sampled sector must carry the same uniform fill. For a hard disk’s enhanced erase, the manufacturer chooses the pattern used to overwrite the media, often zeros. Therefore any uniform fill will be acceptable for verification purposes, and anything else fails. |
| ATA Enhanced Secure Erase (SSD) | Fill or readability check | An SSD may choose to implement an enhanced erase using either a fill or a cryptographic erase, and the first sector of the SSD determines which check is used. If the first sector reads back as one byte repeated, then all sampled sectors must contain that same fill, and any fill that stops short will fail. Otherwise, all sampled sectors must read back without generating any I/O errors, since a cryptographic erase leaves indeterminate content, in line with NIST SP 800-88r2. |
| NVMe Sanitize (Block Erase) | Erased check | Every sampled sector is all 0x00 or all 0xFF. |
| NVMe Sanitize (Overwrite) | Zeros check | Every sampled sector contains all-zero bytes. |
| NVMe Sanitize (Crypto Erase) | Readability check | Every sampled sector returns data without I/O error. |
NVMe Format (-s 1) | Erased check | Every sampled sector is all 0x00 or all 0xFF. |
NVMe Format (-s 2, Crypto Erase) | Readability check | All sampled sectors must read back without generating I/O errors. The check performed depends on the SES value that actually ran. For example, if -s 2 was rejected and the format fell back to -s 1, then the drive is verified using an erased check. |
| SCSI Sanitize (Block Erase) | Erased check | Every sampled sector is all 0x00 or all 0xFF. |
| SCSI Sanitize (Overwrite) | Zeros check | Every sampled sector contains all-zero bytes. |
| SCSI Sanitize (Crypto Erase) | Readability check | Every sampled sector returns data without I/O error. |
| SCSI Format Unit | Zeros check | Every sampled sector contains all-zero bytes. |
| eMMC / SD Erase | Zeros or pattern check | A zeros check where the card erases to 0x00, and a uniform-fill check where it erases to 0xFF (the extended CSD register indicates how this particular card operates). |
| TCG Opal Cryptographic Erase | Readability check | All sampled sectors must read back without generating I/O errors. Blocks that previously held data will read back as ciphertext, and blocks that never stored data will read back as zeros; both are correct. |
| Block Wipe | Zeros or readability check | A zeros check for methods that finish by writing zeros (Zero Fill, DoD Short, and the fixed 3-pass wipe in NIST Purge mode), and a readability check for methods that finish with random data. |
| PSID Revert + re-erase | Set by the re-erase | After an Enhanced Secure Erase, a uniform-fill check (pattern check) on a hard disk or a fill or readability check on an SSD; after any other re-erase, the erased check. |
The Read-Back Guard on Hard Disks
Beyond the zeros check, hard disk drives that were erased using ATA Secure Erase get an additional level of protection. The utility has an “always on” guard against firmware that claims it finished an erase job when it didn’t really do it. The utility samples the media after the firmware says it has finished erasing, and fails the drive when recognizable data survives in the media. Only rotating hard disks qualify under this rule. SSDs do not qualify because they may use a cryptographic erase method, which leaves behind non-uniform ciphertext in place of the original data. Flagging such a condition would be incorrect.
The Ends of the Drive
Regardless of verification settings or erase methods employed, the utility will read back the first and last megabyte of every drive that has been erased before recording any information about it. Some drives’ firmware may leave their final few KB intact after erasure, and a partition table header can survive there. When this occurs, the utility zeroes out the first and last megabyte and reads them back, so an erased drive appears empty to any partition editor. The Advanced Log will display this event as a Post-erase Check line with the byte offset. The sanitization result remains unaffected; a table header holds no user data.
Sampling
You can adjust how much of each drive the verifier reads by changing the Sample percentage on the drive selection screen:
- 100% (default): every single sector on each drive is read. This is the slowest and most complete option.
- 50%, 25%, 10%: the verifier reads evenly spaced sample ranges across the entire LBA range of your drive. As such, you get coverage of the beginning of your media, plus the middle and the end, rather than just the initial portion.
For NIST SP 800-88r2 Purge certification, 100% sampling is recommended.
Secure Erase Verification Progress
When the verification process starts, the main window will display a per-drive progress view. On this view, there will be displayed, for each drive, its check mode badge (ZEROS CHECK, ERASED CHECK, PATTERN CHECK, READABLE CHECK or FILL OR READABLE CHECK), a real-time progress bar, and the result of the scan when it completes:
| Result | Meaning |
|---|---|
| ✓ Pass | Every sampled sector matched the expected check mode. |
| ✗ Mismatch | (Zeros, erased, pattern, or fill or readability check) The verifier encountered a sector that was not consistent with what was expected. The drive’s final result is now Erase Incomplete, and the Sanitization Method on its certificate is Not completed. |
| ✗ Error | (Readable, or fill or readability check) The verifier experienced an I/O error while attempting to read. The drive’s final result is now Erase Incomplete, on the same basis. |
Each drive can verify simultaneously. Therefore, multiple drives may be verifying their data at the same time. Live scans hold about 32 MB of read buffer space each, so the utility uses a queue to schedule the verifies rather than starting every verify immediately. If you want to change how many drives verify at the same time, you can use --verify-jobs N. Similarly, if you want to disable queuing altogether, you can use --verify-jobs 0. On a larger batch, that requires healthy SAS/SATA paths and enough memory. The verifier runs as a background thread for each drive and therefore does not lock up the window when processing large drives at a 100% sample rate.
TUI Verification
The same verifier runs in --tui mode, displaying each drive’s progress on its own row. The verifier also runs in unattended mode and logs each drive’s progress every minute. The pass/fail results, sampling settings and check-mode selections all function identically.
Step 4: Secure Erase Results
This screen displays the final erase results for all drives, followed by the log file and certificate paths. Each drive’s badge indicates which method actually erased it. If a drive refused its own erase command and TCG CRYPTO ERASE or BLOCK WIPE finished the job, the badge will show that method. Drives that have been successfully erased are shown with no additional notes. All details of the entire erase sequence are included in the Advanced Log. There are four possible results for the erase operation:
| Result | Meaning | On the Certificate |
|---|---|---|
| Successfully Erased | The erase command succeeded and either verification was not run or the verification read-back agreed with it. | Purge or Clear, as the method warrants |
| Erase Incomplete | The erase command reported successful completion, but verification subsequently indicated that some data remained present. The erase command had completed execution and yet some data was retained on the media. | Not completed, with NIST SP 800-88r2: NOT ACHIEVED |
| Erase Abandoned | The drive was dropped because it ceased responding, so the state of its media is unknown. | Not completed, with NIST SP 800-88r2: NOT ACHIEVED |
| Erase Failed | The drive’s firmware refused to execute the erase command and neither the TCG cryptographic erase nor the overwrite was able to complete it (or both methods were switched off). | Not completed, with the drive’s own refusal quoted in the log |
Erase Incomplete is not the same as Erase Failed. A person reviewing only a certificate can determine whether a drive ignored the command to erase data or whether it ran the command and left data remaining. Previously, both appeared as failures, and thus a drive with one sector of data left behind could appear identical to a drive that never began executing the command to erase data.
Erasing such a drive again would send the same command again, and firmware that leaves data in place does so every time it receives such a command. To attempt to overwrite such a drive instead, switch it to Block Wipe (check the Block Wipe box on its card in the window, press m in the terminal until it moves past the drive’s own methods to Block Wipe, use --block-wipe DEV on the command line, or add pmerase_blockwipe= in unattended mode). Then erase it again. It will be erased, checked, and documented as a Block Wipe drive: NIST SP 800-88r2 Clear. The first record still identifies what was done by the firmware.
Secure Erase Log Files
The utility will always generate three log files for each session (Combined-Erase-Log-<timestamp>-…), as well as the same three for each drive (<model>_<serial>-Erase-Log-<timestamp>-…):
| Log File | Contents |
|---|---|
Advanced Log (*-Advanced.txt) | The full erase session log contains drive identity data (hdparm -I / nvme id-ctrl / mmc extcsd read), erase results, the Verification Result line, smartctl output and the output from the erase command. This log also contains the lines describing an erase: Erase Sequence (a refused command and what erased the drive instead), Post-erase Check (a partition table cleared from the ends of the drive) and Hidden Area (what a block wipe covered on a drive with an HPA or DCO). |
Basic Log (*-Basic.txt) | The summary log contains the erase results, the Verification Result line and the SHA-256 checksum of the Advanced Log. |
CSV Log (*-Basic.csv) | A spreadsheet-compatible summary that displays one row per drive containing the model number, serial number, capacity, OS, software, finish time, SHA-256 checksum of the Advanced Log, overall result, verification status, method used and temperature. |
The System Information in the log headers derives from the kernel’s copy of the SMBIOS table created at boot time (/sys/class/dmi/id), using dmidecode if necessary, and so does the machine identity transmitted to a report server. This is important because some BIOSes corrupt the live SMBIOS table after a suspend-to-RAM operation, and a certificate should not include a mangled machine name.
Secure Erase Certificates
The utility creates a PDF certificate for each drive erased, named <model>_<serial>-Erase-Certificate-<timestamp>.pdf. In cases where the drive does not identify itself (no model number or serial number), the device name is used in the file name instead. Each certificate contains:
- Organization name, location, and phone
- Host system information
- Timestamps for the sanitization session and the compliance standard
- Record of the drive: serial number, capacity, type of media, operational status, sanitization method (Clear/Purge/Destroy), sanitization technique, NIST/DoD level
- Verification Result: bytes read back, sample spread, check applied, anomalies, duration and throughput rate
- Status of data backup and destination of media
- Paths and hash values (SHA-256) for the logs
- Statement of attestation referencing the active standard (NIST SP 800-88r2 or DoD 5220.22-M)
Certificates generated are single-page documents, allowing easy printing and filing.
Chain-of-Custody Signature Block
The certificates also have a signature row consisting of four columns:
| Column 1 | Column 2 | Column 3 | Column 4 |
|---|---|---|---|
| Technician | Validator | Witness | Date |
If you provided names and titles in Certificate Info, then these will be filled in on the signature lines; otherwise, the signature lines will remain blank for hand signing. The witness column supports formal chain-of-custody requirements where a third-party observer signs off on the sanitization process.
Secure Erase Save Options
All files are saved by default to /home/partedmagic/. To save files elsewhere (the three logs of the session, the three logs per drive with the Advanced Log’s SHA-256, and every certificate), expand “Save Options”:
| Format | Description |
|---|---|
| Uncompressed | Copies all files as-is |
| Gzip (.gz) | Compresses each file with gzip before copying |
| Zip (.zip) | Wraps each file in a zip archive before copying |
Use Browse… to choose your desired directory location, or select Mount to launch Parted Magic Mount and mount an external storage device prior to saving files. The results screen also has options to View Log (to open session logs in leafpad), View Certificate (to view certificates in File Viewer), and Save & Close (to copy the logs and certificates to the selected location and exit). If you also need full-disk imaging, see Parted Magic Clone.
If you had previously entered an email address on the selection screen, upon completion of the task, the utility will send out copies of the same logs and certificates via email. If you had specified a Report server, all logs and certificates will automatically be uploaded to that server as well (see Network Reporting below).
When a Drive Refuses the Hardware Erase
Some drives will refuse their own erase command. Other drives may indicate they were successful but still hold data. A common case is an NVMe drive in a laptop, ThinkPads especially, where the Format command returns with an error in a couple of seconds and nothing is erased.
In such cases, Parted Magic attempts to take an alternative path. Self-encrypting drives are purged via their own encryption instead; any other drives are overwritten, which is Clear. Only when neither method can complete is the drive listed as failed.
TCG Opal Cryptographic Erase
If the drive that refused is a self-encrypting TCG Opal drive, Parted Magic acquires ownership of the drive’s encryption and resets it. It requires two commands: one that activates the drive’s locking system and one that reverts it, which produces a new media encryption key:
sedutil-cli --initialSetup <password> /dev/<dev>
sedutil-cli --revertTPer   <password> /dev/<dev>
All data written with the previous encryption key immediately becomes unreadable. All blocks that were retired or remapped by the controller (which cannot be reached by any overwrite) are made unreadable too. This takes less than a second and never uses the command that the firmware refused. The order is critical: reverting a drive that was never taken into ownership will not sanitize it, so the locking system is always activated before reverting.
A ThinkPad T480s whose Samsung drive refuses to execute NVMe Format at all is sanitized this way while sitting in the laptop, without a PSID and without a second machine. Any drive that honors the platform’s Block SID lock must have that lock removed first, and Parted Magic can request that action from the firmware (see TCG Block SID and NVMe Format). The record states:
Erase Method: TCG Opal Cryptographic Erase
NIST SP 800-88r2: Purge (TCG Opal cryptographic erase)
This is Purge, a higher level than the Clear that an overwrite would result in. The Advanced Log’s Erase Sequence line will add the refusal message given by the drive. Readability verification is all that will occur here, because blocks containing data will read back as ciphertext and blocks that never held data will read back as zeros.
Success is confirmed by asking the drive (Locked = N and LockingEnabled = N), never by the exit status of the command. If there is no success, the drive is reported as a failure and will not be passed to the overwrite, because between the two commands the drive is owned and may lock at its next power-on. In that case the password that this tool had set is put into the record, and the PSID on the label of the drive itself will always clear it. If the drive does not allow this utility to take ownership in the first place, then it is left as is and the overwrite below proceeds as usual.
This applies to Opal drives that report media encryption; drives that use the Enterprise SSC (which is found on some SAS SSDs) will go to the overwrite instead. To disable this feature, use --no-tcg-revert, and those drives will go directly to the overwrite.
The Block Wipe Fallback
All other drives that refuse their hardware erase will be overwritten instead. Fallback behavior occurs within every class: ATA Sanitize, ATA Secure Erase, NVMe Sanitize, NVMe Format, eMMC, SCSI Sanitize, SCSI Format Unit, and the re-erase after a PSID revert. The certificate shows the method and level just as it would for a drive that was block-wiped from the beginning, and the Advanced Log includes details about the sequence of events:
Erase Method: Block Wipe — <method> (dd)
NIST SP 800-88r2: Clear (software block wipe)
Erase Sequence: <the refused command> (<the drive's own words>);
    software block wipe performed — <method> (dd)
That is Clear, not Purge. As mentioned earlier, an overwrite cannot clean blocks that have been retired or remapped by the controller. Thus, instead of claiming the stronger result, the certificate says so. If you want a Purge-level certificate for such a drive, do the erase in a different computer with the drive in an M.2 slot rather than a USB adapter, since USB adapters cannot pass the firmware erase commands at all.
After the overwrite, verification occurs just like it would after any type of block wipe, and the drive’s Advanced Log contains both the firmware’s refusal and the overwrite’s own output.
Fallback wipes do not occur when the refusal was deliberate. The fallback is withheld for: a namespace whose sibling is mounted; a PSID code that is invalid; a PSID revert that did not unlock the drive; a TCG erase that did not confirm; an ATA password that still locks the drive; a crashed erase thread. These are reasons not to touch the drive at all, rather than failed attempts to erase it. Use --no-fallback-wipe to disable fallback wipes altogether; a refused drive will then show up as Erase Failed.
TCG Block SID and NVMe Format
Each time a computer boots, platform firmware sends a TCG Block SID Authentication command to every TCG-capable drive. This is normal and almost universal, for one very good reason: it prevents malware from gaining control of a drive whose SID credential is still set to its factory default. As long as it is set, the drive cannot be taken into ownership. Therefore, the TCG Opal cryptographic erase described above cannot run, and some NVMe firmware will also reject the Format erase.
Just prior to running any erase, the utility performs one read-only TCG Level 0 Discovery command on every NVMe Format drive; nothing is written to the drive. If the drive indicates that SID authentication is blocked, SID BLOCKED appears on the drive card, on the confirmation screen, in --list, on the console and in the log. This is only an advisory message and does not stop the erase: most drives will format without any problem while it is set.
If a drive refuses to erase while the block is set, it will be overwritten instead (Clear), and its Erase Sequence line will tell why the cryptographic erase did not run:
Erase Sequence: NVMe Format refused by the drive (...); TCG Opal
    cryptographic erase refused — the drive would not grant ownership
    (NOT_AUTHORIZED); the platform firmware had set TCG Block SID at
    boot; software block wipe performed — Zero Fill (dd)
Turning it off. On machines whose firmware allows it (TPM Physical Presence operation 97), the confirmation screen provides Turn Block SID Off at Next Start (or o in the terminal interface). Nothing is written to any drive; the request goes to the firmware, and you are asked if you wish to restart. At the next start, the firmware asks you to confirm the change at the keyboard where it requires that. Boot Parted Magic once again and run the erase, and the drive receives its cryptographic erase: Purge. On a ThinkPad T480s with a Samsung PM981, the same drive was overwritten (Clear) while the block was set, and after the block was lifted it was cryptographically erased (Purge) in 19 seconds. The request can be taken back before the restart.
Firmware that keeps the block off afterward, as that ThinkPad does, gets a Turn Block SID Back On at Next Start button on the results screen (or o in the terminal). The 1.4 revision of the firmware interface removes the block for only the next start.
If you are not using the firmware request, work through these steps in order:
- Press Sleep and try to run the erase again. A power cycle clears the block, and some firmware does not send it again upon wake up. The SID BLOCKED badge indicates if the firmware sent it again.
- You can also check the BIOS settings to see if there is a setting to turn off Block SID for the next boot. This option can often be found under Security in the BIOS settings.
- Try erasing the drive in another computer using an M.2 slot, where it is certified as usual. A USB enclosure is not a suitable alternative. A USB bridge only carries normal reads and writes, so the firmware erase commands never reach the drive in any computer and with any software.
Secure Erase Compliance and Standards
Sanitization levels follow NIST SP 800-88r2 (September 2025), and IEEE 2883 outlines the specific methods for sanitizing each type of storage technology.
| Erase Method | NIST SP 800-88r2 Level |
|---|---|
| ATA Sanitize (SSD) | Purge |
| ATA Sanitize (HDD) | Purge |
| ATA Secure Erase (SSD) | Purge |
| ATA Secure Erase (HDD) | Purge |
| ATA Enhanced Secure Erase | Purge (crypto-erase) |
| NVMe Sanitize | Purge |
| NVMe Format -s1 / -s2 | Purge |
| eMMC Erase + Sanitize | Clear |
| eMMC Secure Erase | Clear |
| SCSI Sanitize (SSD) | Purge |
| SCSI Sanitize (HDD) | Purge |
| SCSI Format Unit (SSD) | Purge |
| SCSI Format Unit (HDD) | Purge |
| PSID Revert + re-erase | Inherits level of the post-unlock erase method |
| TCG Opal Cryptographic Erase (after a refused hardware erase) | Purge |
| Block Wipe (any method) | Clear |
| Block wipe after a refused hardware erase | Clear (the Advanced Log names the command that was refused) |
| Erase Failed, Erase Incomplete or Erase Abandoned | Not achieved (the certificate’s Sanitization Method reads Not completed) |
r2 leaves the decision of which Purge techniques to use to IEEE 2883. The device sanitize commands of ATA, NVMe and SCSI drives (ATA Sanitize, ATA Secure Erase, NVMe Sanitize/Format, SCSI Sanitize/Format), as well as the crypto erase of a self-encrypting drive, meet Purge requirements regardless of the type of media, due to their ability to bypass standard read/write interfaces and reach all storage locations, including overprovisioning and remapped sectors. An eMMC’s Erase + Sanitize and its older Secure Erase are both Clear, which is the level published for eMMC Erase + Sanitize under IEEE 2883-2022. Erase + Sanitize still reaches the unmapped blocks of an eMMC in seconds, something a simple overwrite cannot do. Software block wiping via standard write commands (such as dd) is Clear as well.
When DoD 5220.22-M mode is on, all certificate fields reference DoD 5220.22-M, regardless of which erase method is used. The erase commands themselves do not change based on the mode selected; only the certificate fields are affected. Certificate fields are formatted according to the sample Certificate of Sanitization form outlined in NIST SP 800-88r2 Appendix C.
Network Reporting: PM Report Server
Parted Magic runs from RAM, so logs and certificates created locally are lost if the machine loses power before you save them. Network Reporting resolves this issue: while an erase runs, the utility reports the evidence in real time to a PM Report Server on your local network. Therefore, even if power is lost during an erase, the record of what was in progress survives on the server.
The Server
The report server is located in the root directory of the Parted Magic ISO image; on a USB installation it resides in the root directory of the flash drive, next to GPL. The server consists of a single file with no dependencies. To create a report server, copy pmagic_report_server to any always-on machine on your network that has Python 3 installed (Linux, Windows or Mac), then launch it:
# Linux / Mac:
./pmagic_report_server

# If the copy lost its execute bit:
python3 pmagic_report_server

# Windows:
py pmagic_report_server
A window opens when the server starts on a Linux desktop. At the top of the window is the address to give the Erase utility, displayed in large letters along with a Copy button; below it is a live library of everything the server has recorded (see The Server Window below). When running on Windows, on a Mac or on a machine without a display, the server prints the same address in the terminal and runs headless, as before. The window is optional.
Then browse to http://that-machine:8341 in any web browser (including phones on the shop Wi-Fi) to view every erase session in real time. All events are stored under ~/pm-reports/ on the server and saved to disk before the server sends confirmation back to the client; therefore the record survives on the server regardless of what happens to the client.
The Server Window
The window contains all the tools necessary for an operator in one location. The header provides the exact pmreport= line to enter into the Erase utility (selectable, and one click to copy). Directly underneath it is the server’s public key, with Copy key and Save key… buttons to give the key to anyone who may need to verify the evidence generated. Underneath the public key is a library of all drives from all sessions that have been recorded by the server. This library displays the following information for each drive: date, customer, work order, machine, device, model, drive serial, method, result and status. You can filter all of the displayed data by typing in the search box, by drive serial number, model, machine, work order, technician or date. You are also able to sort the displayed data by clicking a column heading. Live sessions are updated in place every few seconds, without changing your scroll position, your sort or the currently selected row. A status line indicates how many drives are being displayed, how many sessions are on record and how many are running now.
Each row representing a single drive shows the live phase of the job as it moves (erasing, then verifying, then finalizing), so a long verification pass will display as progress rather than a stalled erase.
The buttons allow actions on the currently selected row:
| Button | What It Does |
|---|---|
| Export evidence pack… | This button builds a signed evidence pack for the selected session and saves it where you choose. All file dialogs remember the most recently used folder. |
| Save certificate… | Saves the selected drive’s PDF certificate. |
| Verify | This button checks the evidence of the selected session. See below for details on exactly what is checked. |
| Open in browser | If a session is selected, this button opens its page in your web browser. If no session is selected, it takes you directly to the server’s dashboard. |
Verify checks the file first. If you have exported the selected session’s pack during this run, Verify checks that file on disk. If you change a single character inside the exported zip file and then click Verify, it will report TAMPERED and identify the changed file. It will also tell you where the fault is: whether the exported file was changed after export, or some part of the session history on the server itself was changed. It only creates and checks a new pack when no exported copy exists, and the result will say so, since checking a brand new pack is not a check of any file on disk.
You can also drag and drop one or more evidence packs anywhere on this window to verify them. Each result will include its file name, and multiple packs will produce one overall summary. Verification is performed internally by the server (using the same four checks as pmagic_verify; see Signed Evidence Packs below), so this feature works even if the standalone verifier is missing. If pmagic_verify is beside the server, the server will run it instead, since that is the tool your customers run. --no-gui starts the server headless on a desktop machine if you would like only the plain terminal banner.
Configuring the Client
There are four ways to enter your server address. The GUI field always displays what the utility will use; whatever is in the field when the erase starts is what counts, and clearing the field turns reporting off. If no server is set, reporting stays off and the utility sends nothing.
| Method | Description |
|---|---|
| Selection screen | The “Report server” field: saved to ~/.config/report_server and filled in upon the next launch, like the email address. In the TUI, the same field is located on the Cert Info screen (c). |
| Kernel command line | pmreport=HOST[:PORT] and optionally pmreport_token=SECRET. Useful for PXE fleets, since no per-machine setup is required for automatic reporting from each netbooted machine. |
| Environment | PMREPORT / PMREPORT_TOKEN |
| CLI flag | --report-server HOST[:PORT]: overrides the saved field value for that run. |
What Gets Sent
| Event | When and What |
|---|---|
| session_start | When the erase begins, the following is reported to the server: machine identity (manufacturer/product/serial), the full drive list (device/model/serial/size/erase method for every drive), the compliance standard and the verification setting. |
| heartbeat | Every 30 seconds while erasing. |
| drive_done | The instant each drive finishes, pass or fail. |
| logs_written | The final per-drive results. |
| files | All logs and CSV files created during the session (the session’s and each drive’s) and every PDF certificate upload on completion, along with any Physical Destruction certificates. |
When the Server Is Not There
If a configured server goes down, you do not lose evidence without knowing it. Three things happen.
Before the erase, the confirmation screen checks the server and reports plainly whether or not it will accept this machine’s evidence, in both the window and the terminal interface (under the clock). This is a warning message rather than a refusal. As long as you choose to erase with the server down, the erase will still occur. In unattended mode, a warning message is written to the log and then the erase proceeds. When the evidence is then only in memory, the machine will remain powered on after the erase completes, instead of powering off, so that the logs and certificates can be saved.
After the erase, everything the server could not accept will be stored in a spool area, called report-spool and kept beside the log files by default, or wherever the user directs it using the --report-spool option. Each item in it is independent, containing the events that failed along with copies of the relevant logs and certificates. The results screen names both the spool and the command that empties it.
Later, once you can reach the server again:
erase --report-sync SPOOLDIR --report-server HOST[:PORT]The command verifies the server’s status before sending any information. If the server fails that check, the command will deliver no information to it. Next, it will deliver each item individually. Any successful deliveries will be moved into SPOOLDIR/sent. Only when there is nothing left behind after the last delivery will the command exit with status 0, so this method is effective in use within scripts. This method will erase nothing, and it will not wait for the single-instance lock, allowing you to run it from a terminal while the results screen that reported the failure is still open.
A spool in RAM is still in RAM. If the logs are located in a tmpfs directory, the spool is too, and both will disappear upon shutdown. You will know if these directories are being stored in a tmpfs directory because the utility will notify you. To avoid losing them, simply direct the --log-dir or --report-spool option to a mounted disk or share.
The Dashboard
The dashboard is the web page served by the server. To see it, open http://that-machine:8341 in any web browser. There is no installation necessary. The dashboard contains one row per machine: session, machine identity, number of drives done out of the total, and a live status that changes every five seconds. Clicking a row displays the details of the individual drives, including links to download the related files. /export.csv exports one spreadsheet row per drive across every session recorded by the server.
| Status | Meaning |
|---|---|
| ERASING | Session is live and sending heartbeats. |
| COMPLETE | Session finished with every drive passing. |
| FAILURES | The session ended normally, but one or more drives did not pass (Erase Failed, Erase Incomplete or Erase Abandoned). |
| STALLED | The server received no traffic for 90 seconds and no session end was ever received. Usually this means the power went out. Everything received prior to this point is safe on the server: the drive list from the start of the session, every heartbeat, and every drive that had completed. |
| REFUSED | An unattended run refused its policy, so no drive was erased. The reasons for the refusal are found on the session page. |
| ABORTED | A manual abort occurred at the console, so no drives were erased. |
| DESTRUCTION | A physical destruction certificate was received. |
Phone and Email Alerts
Besides reporting, the server can also send you an alert message when something requires your attention. Alert messages may be triggered by several different events: a drive failure, a stalled session, and job completion. Each alert channel is optional and disabled by default; each channel is a single flag when you start the server. The simplest of these channels is email:
./pmagic_report_server --alert-email tech@example.com --smtp mailhostEvery time an alert occurs, an alert message is sent to the shop inbox through your own mail server, without installing anything new. Two other alert channels exist for shops that wish to take advantage of them; however, none of these alert channels are mandatory, and the dashboard works whether or not you set up any of them. Like reporting, alert delivery runs on a separate background thread with short timeouts, so it never slows down or blocks an erase.
| Flag | What It Does |
|---|---|
--alert-email ADDR --smtp HOST[:PORT] | Emails every alert through your own mail server. The flag can be repeated for multiple recipients. |
--alert-webhook URL | Posts every alert as JSON, for scripting or for integration with other services such as ticketing systems or chat. |
--alert-ntfy URL | Sends push notifications through an ntfy relay (either self-hosted or ntfy.sh) to the free ntfy app installed on any phone, iPhones included. |
--alert-on LIST | Selects which alerts are sent: any of drive_failed, stalled, complete. Default: all three. |
Watch the Bench From Your Phone
On Android, download and install Parted Magic Erase Monitor from the Google Play Store. The app is free and published by Parted Magic LLC, and its Play data safety entry states that no data is collected or shared: it communicates only with your report server on your own network. Give it the same server address you gave the Erase utility, and every session on the bench will appear on your phone as it runs, including drives that fail.
On an iPhone, or on Android if you would rather not install anything, you can pin the dashboard to your home screen as a web app. Open the dashboard in Safari and select Share → Add to Home Screen, or in Chrome select menu → Add to Home screen. A Parted Magic icon will then appear on your home screen and open the dashboard in full-screen view, with nothing to install and nothing to update.
Reliability and Security
Reporting never blocks, delays or fails an erase: all reporting is done in a background thread with very short timeouts. Once the erase is complete, the utility will wait for a brief time for any remaining uploads before displaying the results, but only as long as the uploads are succeeding (no longer than two minutes; an unreachable server skips the wait). Each stored event includes a SHA-256 hash chain, so a record that was altered on the server after receipt can be detected, and an optional shared token (--token on the server, pmreport_token= on the client) limits who can submit reports.
Running Without a Display: Servers and Serial Consoles
A rack server is often reached only through its management controller (iDRAC on Dell servers, iLO on HPE servers, IPMI on other vendors’ equipment), and its video signal comes from a BMC-integrated chip instead of a graphics card. There are systems where the picture stops once the operating system takes control of the video output, and there are also many systems without a monitor anywhere near the rack. Neither case has to prevent you from erasing the drives, since the entire utility runs within a terminal: erase --tui does not require X11 or GTK, and it produces the exact same logs, the same Verification Result line and the same PDF certificates as the window.
Booting to a Serial Console
There is a boot menu entry for this. From the main menu, choose Failsafe and then Serial console – no video needed. It will boot with no graphical environment and give you a login prompt on the first serial port at 115200 baud, so an existing serial-over-LAN session becomes a working shell. The entry exists in both the UEFI and legacy BIOS menus, and its kernel line reads:
consoleboot=yes console=tty0 console=ttyS0,115200n8Because tty0 is included in the list, kernel messages are still displayed on the local screen if one is connected and working. If your controller uses a different baud rate, edit the entry in the menu and change the baud rate; the login follows whatever the kernel line says. If your serial port is not the first one, specify it: console=ttyS1,115200n8.
The login prompt is added only where the named port is real hardware. Therefore, a desktop with an unused /dev/ttyS0 node gets no login prompt, and nothing is left running on it.
Erasing Over the Serial Console
After you obtain access to the shell, the flow is the same as what you would experience in the window: Select, Confirm, Erase and Results:
# the whole utility, in the terminal:
erase --tui --nist --verify 100 --log-dir /mnt/usb/logs \
      --work-order WO-2024-0042 --technician "Jane Doe"
Use --log-dir, and point it somewhere that survives a reboot. Parted Magic operates out of RAM; therefore, by default, logs and certificates are written into memory and disappear when the machine is restarted. Save them to a mounted disk or network share, or set a Report server, which will send the logs and certificates off the machine while the erase is still running. On a headless server, use both.
For a fleet of computers, you can bypass the console altogether: see Unattended Mode: PXE Auto Nuke below. The policy is contained in the kernel command line, the evidence is sent to the report server, and each machine automatically shuts down when it is finished.
Unattended Mode: PXE Auto Nuke
Boot, erase based on a policy, report as events occur and shut down, with nobody at a keyboard. Unattended mode is turned on by pmerase=auto on the kernel command line and by nothing else, so it fits perfectly with a PXE netboot setup: one boot menu item erases every machine that boots it, the same way, while the evidence is transmitted to your PM Report Server as events occur. Like any other session, each unattended session can be exported as a signed evidence pack (see Signed Evidence Packs below).
Example PXE Append Line
append initrd=initrd.img pmerase=auto pmerase_confirm=ERASE-ALL-DATA \
  pmerase_targets=all pmerase_method=zero pmerase_verify=100 \
  pmerase_on_done=poweroff pmreport=10.0.0.5:8341
Kernel Keys and CLI Equivalents
Each kernel key has a CLI equivalent for bench testing, and a CLI flag overrides the kernel command line. The full details of how the options work, including the refusal reasons and exit codes, are contained in the built-in manual (Help in the app, or erase --help, section UNATTENDED MODE).
| Kernel command line | CLI equivalent | Purpose |
|---|---|---|
pmerase=auto | --auto | Turns unattended mode on; nothing else does |
pmerase_confirm=TOKEN | --auto-confirm TOKEN | Must be exactly ERASE-ALL-DATA |
pmerase_targets=all|sda,sdb | --auto-targets all|sda,sdb | Explicit target policy; there is no default |
pmerase_exclude=sdc,sdd | --auto-exclude sdc,sdd | Drives to leave alone |
pmerase_verify=off|10|25|50|100 | --auto-verify LEVEL | Post-erase verification (full verify unless told otherwise) |
pmerase_delay=SECONDS | --auto-delay SECONDS | Abort window at the console before the first write |
pmerase_on_done=poweroff|reboot|halt|stay | --auto-on-done ACTION | What happens when the run completes |
pmerase_method=KEY | --method KEY | Block-wipe method; required whenever a target needs one |
pmerase_sanitize=MODE | --sanitize-method MODE | Hardware sanitize sub-method |
pmerase_se=MODE | --se-method MODE | ATA Secure Erase method |
pmerase_nist=1 / pmerase_dod=1 | --nist / --dod | Compliance standard on every certificate |
pmerase_work_order=TOKEN | --work-order TOKEN | Work order embedded in every certificate |
pmerase_blockwipe=sdb,sdc | --block-wipe sdb,sdc | Use Block Wipe to erase these drives even though they have hardware-based erase functionality (NIST Clear) |
pmerase_no_fallback_wipe=1 | --no-fallback-wipe | Report a refused hardware erase as failed instead of overwriting |
pmerase_no_tcg_revert=1 | --no-tcg-revert | Do not attempt to perform a TCG cryptographic erase of a self-encrypting drive that refuses its own erase command |
pmreport=HOST[:PORT] | --report-server HOST[:PORT] | Recommended: the evidence leaves the machine while the erase runs |
The Safety Contract
Unattended mode was designed so that it cannot accidentally erase anything. The run will stop, erase nothing, and leave the machine powered on with the reason on the console, unless all of the following conditions are met:
pmerase=auto, exactly: notpmerase=alone, and not some other value that looks true.- The confirmation token
ERASE-ALL-DATA, verbatim. A DHCP entry that someone forgot to retire cannot provide the confirmation token by accident, and the boot configuration that contains the token is a record of who intended the erase. - An explicit target policy; no default set of drives exists.
- An explicit block-wipe method for each target that needs one. “zero” is a policy decision with compliance consequences, and therefore it is never assumed.
- An abort window at the console before the first write, which can be cancelled by any key press.
Without an override, the following rules always apply: the running system’s own drive and the medium it booted from will never be targets. Drives that have been locked via PSID will never be automatically selected. Any drive that has a filesystem mounted on it will never be automatically erased. NIST Purge is refused outright on RAID LUNs and hypervisor virtual disks. ATA-frozen drives will never be erased while they remain frozen. If any drives are found to be frozen, unattended mode first suspends for five seconds to unfreeze them, as the Sleep button does, then detects the drives again and skips only those that remain frozen. When pmerase_targets=all is specified, such drives are skipped and reported; if they are named explicitly, they stop the run.
A report server is suggested, but optional. Prior to the first write, the client calls the server’s /api/health endpoint. This confirms that the listener on the server side is a PM Report Server, that this machine’s token (if any) will be accepted, and that the server’s disk has room to store evidence right now. Without a server, or with one that fails that test, the run logs a warning message and proceeds with the erase, retaining its logs and certificates on the machine; if these exist only in RAM, the machine stays powered on after completion instead of running pmerase_on_done, so they can be saved.
The Evidence Trail
An unattended run maintains a record of all actions taken and all decisions made not to take specific actions. Each session that appears on a report server includes the resolved policy, every target, and every drive that was skipped, along with the reason why it was skipped. The Advanced Log header has an Unattended Mode: line naming how unattended mode was turned on and the action taken upon completion, and it also contains an Unattended Skipped: line listing any drives that auto-selection left alone. The dashboard, CSV export and signed evidence pack all mark the session as unattended. Even refusals are recorded: a machine that declines to erase checks in with its reasons, and thus will show up on the dashboard as a machine that refused rather than a machine that simply didn’t appear.
Exit codes: 0 means all drives were erased, 1 means a drive failed or the evidence record could not be produced, 2 means the policy was refused, and 3 means the run was aborted at the console or nothing was eligible.
Signed Evidence Packs
Every session stored on the report server may be exported as a signed evidence pack: one zip containing all the files the server holds for that session, sealed with a cryptographic signature. You can give the pack to a customer along with the invoice, and their auditor may verify the result for each drive on any machine, offline, without an account. The signature can be checked for as long as the files exist.
What Is in a Pack
| File | Contents |
|---|---|
files/ | All logs, the CSV summary, and every PDF certificate |
events.jsonl | The live event record, hash-chained |
session.json | Session summary: machine, drives, results |
MANIFEST.json | SHA-256 of every file above |
MANIFEST.sig | Ed25519 signature over the manifest |
PUBKEY.txt, README.txt | The signer’s public key and verification instructions |
The server generates its Ed25519 signing key automatically on its first run and stores it in keys/signing.key inside its data directory. The matching public key is printed in the banner at startup and shown in the footer of the dashboard, and it is also served at /pubkey. Give it to your customers once, separately from the packs.
Back up keys/signing.key and treat the server’s data directory like a credential. The signing key represents your organization’s identity for signing evidence packs: anyone able to read the key can sign packs in the name of your organization. If it is lost, packs signed with a new key will not match the public key you gave to customers previously.
Verifying a Pack: pmagic_verify
The pmagic_verify program ships next to pmagic_report_server in the root folder of the Parted Magic ISO. It is also a single script, which runs on any machine equipped with Python 3:
./pmagic_verify pack.zip --pubkey <64-hex-char public key>The verifier checks four different things before it prints a result. First, it verifies the validity of the signature over the manifest using the provided public key. Second, it computes the SHA-256 of every file listed in the manifest and requires an exact match with the value stored there. Third, it rejects any file in the pack that the manifest does not list. Finally, it walks the internal event chain again. It then prints VALID along with the machine and per-drive results, or TAMPERED along with the specific findings. Exit code 0 means valid, 1 means tampered, and 2 means the pack could not be read at all (a missing or unreadable file, or a usage error). Only treat exit code 0 as success in scripts.
If you do not provide the --pubkey option, the verifier will use the public key embedded within the pack. This indicates that the pack is self-consistent but does not show who created it, and the output says so. Therefore, always verify against a public key received from the organization directly.
The report server performs the same four checks itself. To perform these checks, select a session in the server window and click Verify, or simply drop a pack file onto the server window. pmagic_verify is still the tool to give to customers and auditors, and it remains a separate program because whoever checks the evidence should not have to run the software that produced it.
Check It Yourself
Files from a real erase are published so that anyone can run these checks without having to purchase anything. The session was taken from a Samsung SSD 980 250GB, serial number S64CNJ0R809052L, in a Dell OptiPlex 7010 on August 18, 2026: NVMe Sanitize Block Erase, verified at 100%, documented as NIST SP 800-88r2 Purge.
- bd059f962cd4.zip: the signed evidence pack
- pmagic_verify: the verifier itself
- signing.pub: the public key of the server that signed it
- The certificate: also included in the pack, and available separately so it may be reviewed first
Place all four items in a single directory, disconnect from the network if desired, and run:
./pmagic_verify bd059f962cd4.zip --pubkey-file signing.pubVALID
signer public key : 325d6289c6eb61bc03d8341ece708de4c6e73a0ad319f46e8f6a7b9bd3acae31
session : bd059f962cd4
exported : 2026-08-18T11:30:40-05:00
files verified : 8 · 13 chained events
machine : Dell Inc. OptiPlex 7010 (serial F501GX1)
mode : attended
/dev/nvme0n1 Successfully ErasedThen change it on purpose and check that the verifier detects it. Create a copy of the pack file, extract the drive’s Basic log, change Verification Level 100% to Verification Level 10%, place the changed file back into the zip file and run the same command again:
TAMPERED
  - hash mismatch (file altered): files/Samsung-SSD-980-250GB_S64CNJ0R809052L-Erase-Log-2026-08-18-1125-Basic.txt
The name of the altered file is printed. The same occurs with the certificate, the CSV, the event log or the manifest itself, since the signature covers a hash of every file in the pack.
Physical Destruction Logging
To open the Physical Destruction workflow, click Destroy… on the drive selection screen. No erase runs here. This workflow only records that the drives were physically destroyed and generates a signed certificate for your records.
When to Use This
Use Physical Destruction logging when drives will be shredded, degaussed, incinerated or otherwise destroyed instead of erased. According to NIST SP 800-88r2, physical destruction is classified as the “Destroy” sanitization method (Section 3.1.3), which applies when the media will not be reused.
Destruction Methods
- Shredding: industrial cross-cut or granular shredder
- Degaussing: electromagnetic field erasure (tape / HDD)
- Disintegration: granulator or disintegrator
- Incineration: high-temperature combustion
- Crushing / Bending: hydraulic press or manual bending
- Drilling / Punching: physical perforation of platters or chips
- Degaussing + Shredding: combined (highest assurance for HDDs)
- Other: free-text notes field
Session Fields
| Field | Description |
|---|---|
| Date of Destruction | Date the destruction was carried out |
| Contractor / Facility | Name of the destruction facility or vendor |
| Contractor Ref # | Manifest or job reference from contractor |
| Authorized By | Name of person authorizing destruction |
| Witness | Independent witness to the destruction |
| Work Order | Links the certificate to a broader asset disposal job |
Drive Fields (per drive)
Each drive row contains the device node (filled in from automatically detected drives, and editable), model, serial number, capacity, asset tag (filled in from the selection screen if set) and notes. The detected drives are filled in automatically. Click Add Drive Manually to enter drives that are not attached, for example drives already destroyed that you want to document afterward.
Physical Destruction Certificate
The generated PDF has a deep red header to distinguish it from sanitization certificates. It includes organization and contractor information, a record for each drive with its serial number and destruction method, the NIST SP 800-88r2 Destroy disposition statement, authorized-by and witness signature lines, and a QR code containing the key certificate fields for verification. The utility saves the certificate as Physical-Destruction-Certificate-YYYY-MM-DD-HHMM.pdf and, if a Report server is set, uploads it there as well.
Dark / Light Theme
You may switch between themes at any time by clicking either [Light] or [Dark] in the action bar of the drive selection screen. Changes take effect immediately across all open windows, without the need to restart. The utility stores the theme in ~/.config/cert_info.json and restores it on the next launch.
Both themes stand on their own: the utility does not use the system GTK theme, Adwaita or any external CSS file. All colors used within the application are hard-coded into the software. This means that regardless of your choice of desktop environment or any GTK-based preferences, the application will always look exactly the same.
Dark (default)
Dark navy/charcoal background with accents in blue (#2a7fff). Designed specifically for working in low-light areas and data center environments.
Light
White/clean light gray backgrounds with the same blue accent. Easy to view in bright, overhead fluorescent lighting conditions. Better suited for creating screenshot images for inclusion in reports.
Sound and Notification on Secure Erase Completion
There are two optional alerts that go off when all selected drives complete. Each of these checkboxes is located in the lower action bar of the drive selection screen.
Sound on Completion
The utility produces a synthetically generated two-note chime via ffplay. No audio files are needed since the utility generates tones in real time.
| Outcome | Sound |
|---|---|
| Success (all drives passed) | Rising chime, 880 Hz → 1320 Hz |
| Failure (any drive failed) | Falling tone, 440 Hz → 220 Hz |
You can test whether the success chime sounds prior to erasing the drives by clicking Test next to the checkbox. If ffplay is not installed, the utility skips this option without a message. Sound also plays in --tui mode.
Summary Popup
Once the results window has opened, a small dialog window will appear displaying pass/fail status information for all erased drives. This dialog window will appear approximately 350 ms after the results window displays, and you can dismiss it without closing the main application window. Both options are disabled by default, and they are kept for later sessions in ~/.config/cert_info.json.
Secure Erase Command-Line Options
Secure Erase Modes
| Flag | Description |
|---|---|
(default) | GUI mode: the full GTK3 window. |
--tui | Terminal user interface (curses): does not require X11 or GTK. It runs all of the Select, Confirm, Erase and Results steps directly within the terminal session, so it will also work over a serial console connection (see Running Without a Display). Exit code 0 = all drives succeeded; exit code 1 = one or more drives failed. |
Drive Selection
| Flag | Description |
|---|---|
--select sda,sdb | Automatically selects the named drives for erase. The names can include or omit the /dev/ prefix. You can still select other drives manually during the interactive process. In the TUI, this works even for a drive that was frozen when the utility started. |
--list | Displays the list of detected drives along with their erase methods and then exits (without performing any erase). |
--check-deps | Checks that all necessary external programs and Python packages are installed and then exits. It displays OK or MISSING for each dependency, and unused for a fallback certificate viewer that is absent while an earlier one is present. Exit code 0 = all required dependencies are available; exit code 1 = at least one is missing. |
Erase Options
| Flag | Description |
|---|---|
--nist | NIST SP 800-88r2 Purge mode (same as the NIST toggle). |
--dod | DoD 5220.22-M certificate annotation. |
--verify PCT | Post-erase verification percentage: 10, 25, 50 or 100 percent. Below 100%, the sample is spread across the media instead of being read from the beginning of the drive. |
--verify-jobs N | The number of drives that may verify simultaneously. 0 turns the queue off and starts all drives at once; since each live scan holds about 32 MB of read buffers, 0 on a large batch requires healthy SAS/SATA paths and an adequate amount of RAM. |
--method KEY | Block wipe method for all block-wipe drives. Keys: zero, random, ops2, dod_short, dod, gutmann, prng. Default: zero. |
--block-wipe DEV | Erases these drives (comma-separated) using Block Wipe, even though they have a hardware erase method available, because a previous hardware erase left data behind on the drive. The Block Wipe box on a card in the window and m in the terminal both provide the same function. NIST Clear. |
--se-method MODE | ATA Secure Erase method for all Secure Erase drives: enhanced (default where supported) or standard. Ignored for those that only support one method. |
--sanitize-method MODE | Hardware sanitization sub-method for all Sanitize class drives (ATA/NVMe/SCSI): block (default), overwrite (one-pass zeros), or crypto. crypto also switches NVMe Format drives to -s 2 if supported by the drive. Applied to a drive only where supported; the rest remain with their respective defaults. |
--work-order WO | Work order number embedded in every certificate. |
--log-dir DIR | Logs and certificates are written out to DIR instead of ~/. As Parted Magic runs from RAM, the default location is not persistent across reboots; point this at a mounted disk or share whenever you will not be saving the files by hand afterward. |
--no-fallback-wipe | Does not overwrite a drive whose firmware has declined its hardware erase. By default the drive is block-wiped instead and recorded as NIST Clear; with this flag it is simply reported as failed. See When a Drive Refuses the Hardware Erase. |
--no-tcg-revert | Does not use the encryption on a self-encrypting drive to erase it when its firmware refuses to perform its hardware erase. By default such a drive will have its media key regenerated (NIST Purge) before an overwrite fallback is considered; with this flag, such drives will go directly to the block-wipe fallback. |
--report-server HOST[:PORT] | Streams live status information, logs and certificates directly to a PM Report Server on the network (default port number 8341). Overrides the saved Report server field value for that run. See Network Reporting. |
--report-spool DIR | Where to store the evidence the report server would not accept. By default, it goes in a report-spool directory beside the logs. You will be able to deliver the evidence at a later time using --report-sync. |
--report-sync DIR | This option delivers each session saved in DIR to the report server, and then exits. It requires --report-server. Entries accepted by the server are moved to DIR/sent, and the exit status will only be 0 if no items are left behind. It erases nothing and does not wait for the single-instance lock. |
Certificate Options
| Flag | Description |
|---|---|
--org-name NAME | Organization name for certificates. |
--org-location LOC | Organization location (city / facility). |
--org-phone PHONE | Organization phone number. |
--technician NAME | Technician name for signature block. |
--technician-title T | Technician title for signature block. |
--email ADDR | An email address that the utility records on the certificate and also uses to send the log files via mailx upon completion. |
PSID Unlock
A self-encrypting drive that is also locked by an ATA password first tries the password pmagic, which needs no code. Otherwise, provide the PSID with --psid-code DEV:CODE[,DEV:CODE…], or input the PSID in the PSID field of the drive on the selection screen. The 32-character code is provided on the label of the drive, and the utility pre-selects the drives listed for erase.
A PSID revert does not always erase the data by itself. On a self-encrypting drive that has never been taken into ownership, which is true for most drives, the revert may indicate success and leave the partition table and all files completely intact. Therefore, after a revert, the Erase utility always erases the drive again using the best method advertised by its firmware, rather than regarding the revert as the sanitization. The standalone PSID Unlocker checks the media both before and after the revert and reports whether the data survived.
Secure Erase Examples
# List all detected drives without erasing:
erase --list

# TUI — interactive terminal drive selection and erase:
erase --tui

# TUI — pre-select drives, NIST Purge, verify 100%, log to USB:
erase --tui --nist --verify 100 \
    --select sda,sdb --log-dir /mnt/usb/logs --work-order WO-2024-0042

# TUI — DoD mode, full cert info, email results:
erase --tui --dod \
    --work-order WO-2024-0042 \
    --org-name "Acme Corp" --org-location "New York, NY" \
    --technician "Jane Doe" --technician-title "IT Specialist" \
    --email reports@acme.com --log-dir /mnt/usb/logs

# TUI — NIST Purge with live network reporting:
erase --tui --nist --verify 100 \
    --select sda,sdb --report-server 192.168.1.50

# TUI — block wipe with Gutmann method:
erase --tui --select sda --method gutmann

# TUI — unlock and erase a PSID-locked SED:
erase --tui \
    --psid-code sda:12345678901234567890123456789012

# Deliver evidence parked while the report server was down:
erase --report-sync /mnt/usb/logs/report-spool \
    --report-server 192.168.1.50

# Report a refused hardware erase as failed instead of overwriting:
erase --tui --select nvme0n1 --no-fallback-wipe
Secure Erase Notes
- Regardless of
--select, the utility always excludes boot and system drives, along with the medium it booted from. - The utility will never auto-select a drive that is PSID-locked; you will need to use
--psid-codeto include these drives. - CLI options (
--org-name,--technician, and so on) override the saved values in~/.config/cert_info.jsonfor the duration of the current run only.
Saved Files and Configuration
| Path | Purpose |
|---|---|
~/.config/email | Last-used email address |
~/.config/report_server | Last-used Report server address (cleared when the field is emptied) |
~/.config/cert_info.json | Organization and chain-of-custody information, theme, sound and pop-up preferences, and block wipe method selections |
/tmp/nist_purge_mode | Presence enables NIST Purge mode |
/tmp/dod_mode | Presence enables DoD 5220.22-M mode |
/tmp/pmagic_gtk3_erase.lock | Single-instance lock (PID) |
By default, the utility saves log and certificate files to /home/partedmagic/, and --log-dir changes this location. On the server side, the PM Report Server keeps everything under ~/pm-reports/ on whatever machine it is running on, including its signing key in keys/signing.key.
Recovering a Drive After an Interrupted ATA Secure Erase
ATA Secure Erase is a two-step firmware operation: first, the utility sets an ATA security user password on the drive, then it issues the erase command, and finally it turns security off once the erase is complete. Parted Magic’s password for this purpose is pmagic. Normally this all happens automatically, and the password is removed before the drive reaches the Results screen, so you’ll never see it.
If an ATA Secure Erase is interrupted by power loss, a reboot, sleep, a cable disconnect or an app crash, the drive can be left with the security password still set.
In that case, the drive is locked. It may display a very small capacity, be unable to mount, report “security frozen,” or simply disappear from your operating system altogether. Your drive is not dead. The password that Parted Magic set is pmagic, and removing that password will restore the drive to normal use.
This only applies to the ATA Secure Erase path. ATA Sanitize, NVMe, SCSI and eMMC erases do not set a security password, so they cannot cause your drive to become locked in this manner.
The Password Is pmagic
Before each ATA Secure Erase, the utility runs hdparm --security-set-pass pmagic /dev/sdX to set the drive’s user password, followed by hdparm --security-disable pmagic /dev/sdX after the erase completes, to clear it. If the process stops between setting the password and clearing it, the password pmagic remains set in the drive’s firmware. Knowing it is all you’ll need to restore the drive: no manufacturer master password and no special equipment.
Recovery: ATA Security Disable
If you intended to erase the drive anyway, run the Erase utility again: a drive that has been locked with pmagic is listed with a LOCKED badge and erased with that same password directly, with no separate unlock step. It tries the password only once, since each wrong attempt uses up one of the drive’s tries, and if the drive refuses it, nothing is written and the record explains how to remove the owner’s password.
Parted Magic provides a separate tool to unlock the drive and make it work normally again without erasing it: ATA Security Disable (pmagic_ata_security_disable). It unlocks the drive with the given password, then turns security off so the drive operates normally again. It does not erase any data; it only removes the ATA password.
- If your drive shows as frozen, power-cycle the machine first (or press the Sleep button in the Erase app), because security commands cannot run on a frozen drive.
- Run ATA Security Disable and choose your locked drive.
- You shouldn’t have to type anything into the password field. It’s best to leave the default password,
pmagic, which is the password Parted Magic set, unless you’re positive the password was set to something else. - Make sure Use master password isn’t checked. A Parted Magic erase uses the user password (
pmagic). - Click Disable Security to confirm. The tool will unlock the drive, turn its security off, and write a log of the exact
hdparmcommands it ran, recording the drive’s security status both before and after.
A drive that was locked at power-on may still show zero capacity right after unlocking, due to the kernel caching the identity it read while the drive was locked. The tool forces the kernel to read the drive again and reports what it then sees, so you won’t be left looking at a 0-byte disk that is actually fine.
After Unlocking
Once security is off, the drive is free to use normally (partition it, erase it again, and so on), and its full capacity is available. If you were attempting to sanitize the drive, go ahead and run the Erase utility again: an interrupted erase leaves the data in an unknown state and should never be assumed to be complete.
Warning, retry counter: Each incorrect password entered increases the security counter kept inside the drive. Most drives will refuse further passwords after about five wrong ones in a row and will require a full power cycle before they accept more. Don’t keep guessing passwords over and over again. For a Parted Magic erase the password is always pmagic, so enter it exactly once.
Once a drive’s firmware holds a password, it locks and freezes again on every wake-up from sleep. Therefore, neither the Sleep button nor a link reset will unfreeze it. Hot-plugging the drive (pulling it and reconnecting it) or clearing the password in your BIOS setup will solve this. Note: some BIOS setups do not allow booting while a password-protected drive is connected until you type the password during the Power-On Self Test (POST).
If you don’t know either the user password (pmagic) or the manufacturer master password (for example, on a drive locked by another tool), then you’ll have one last choice for a self-encrypting drive that continues to identify itself as such while it is locked: a PSID Revert. The Erase utility lists such a drive with the badge PSID REVERT. A PSID Revert is destructive: it cryptographically erases the drive, using the 32-character PSID code printed on the drive’s label. On certain drives, including the Samsung 860 EVO, an ATA password also closes the encryption interface, which prevents a PSID Revert from reaching them, so only the user or master password can remove it.
ATA Security Disable: Command Line
| Command | Description |
|---|---|
pmagic_ata_security_disable | Launch the GUI. |
pmagic_ata_security_disable --list | List eligible drives and exit. |
pmagic_ata_security_disable --check-deps | Verify required programs are installed. |
pmagic_ata_security_disable --manual | Print the full manual to stdout. |
Secure Erase Troubleshooting
If you hit a problem not listed below, please also see the Parted Magic support page.
Drive Detection Issues
| Problem | Solution |
|---|---|
| Drive not listed | The drive may be configured in RAID mode in your BIOS/UEFI (change it to AHCI). A self-encrypting drive that has been locked by a password will appear in the “Locked Drives — PSID Revert” section rather than in the list of other drives. Click Re-detect Drives after connecting a drive without rebooting. |
| Drive shows BOOT DRIVE | The drive contains the running operating system, or it is the medium you booted from, so the utility prevents it from being selected. Boot from another device if you wish to erase it. |
| Drive shows MOUNTED | One or more partitions on this drive are currently mounted. You can select the drive; however, the confirmation window will warn you that there are mounted partitions. Unmount any mounted partitions before erasing, where possible. |
| USB drive not listed | USB drives will be shown in the Block Wipe section of the application. To display them, click “Show Block Wipe” in the Options bar. |
| Empty card reader not listed | This is expected. A card reader or any other removable media slot with no media in it is not offered as a zero-byte target. |
| eMMC not listed | The card advertises neither Sanitize nor Secure Erase (SEC_FEATURE_SUPPORT bits 6 and 0) in its extended CSD register, or it is an SD card, which has neither, so it appears in Block Wipe instead. The mmc tool must also be installed for a hardware erase. |
| Drive shows FROZEN | The BIOS has frozen the drive’s ATA security. Click Sleep: the utility suspends briefly and then restarts, which should unfreeze the majority of drives when they are power cycled. If the firmware already holds an ATA password on your drive, the drive will freeze again each time the machine suspends and resumes. In that case, hot-plug the drive (unplug it and plug it back in) or clear the password in the BIOS setup. |
Erase Operation Issues
| Problem | Solution |
|---|---|
| SMART gate blocking Start Erase | One or more drives from your selection have failed the SMART health check. Please see the red warning box on the confirmation screen, then either check the override checkbox to continue erasing the failing drive in spite of this failure, or click Back to remove the failing drive from your list of selected drives. |
| Erase Failed | The firmware of the drive refused to execute the erase command, and neither of the fallback options (the TCG cryptographic erase, for self-encrypting drives only, and the overwrite) could complete it, or they were turned off with --no-tcg-revert and --no-fallback-wipe. The drive’s exact refusal is shown on its Erase Error: line in both logs, and the complete output of the erase command is in the Advanced Log. It is possible that the drive is locked, failing, or unsupported. For more information, please refer to When a Drive Refuses the Hardware Erase. |
| Erase Incomplete | The erase command executed successfully; however, the verification process found remaining data on the drive. The Verification Result line notes where the first remaining data is, and names the final sector as such when that is where it is (a known defect in some drives’ firmware). Then try an alternate erase path on the drive if one is available, or switch the drive to Block Wipe (the Block Wipe box on its card, m in the terminal interface, or --block-wipe DEV on the command line) and erase it again. Block Wipe is certified as NIST Clear. |
| Erase Abandoned | You dropped the drive because it became unresponsive, so there is no knowledge of what condition its media is in, and the certificate states that clearly. You need to erase the drive again on a machine where it responds. |
| Certificate shows Block Wipe on a hardware-erase drive | Either the drive’s firmware refused its hardware erase and the drive was overwritten instead, or you chose to switch it to Block Wipe; in either case the drive has been certified as NIST Clear. The Advanced Log says which: the Erase Sequence line quotes a refusal, and a switched drive’s log names the hardware erase it was chosen over. This is expected behavior. If you want a Purge-level certificate, you will need to erase the drive in a different machine, using an M.2 slot rather than a USB adapter. |
| Certificate shows TCG Opal Cryptographic Erase | The drive refused its hardware erase and, being self-encrypting (TCG Opal), was erased through its own encryption instead, which is NIST Purge. The Advanced Log’s Erase Sequence line shows the refusal. Please refer to TCG Opal Cryptographic Erase for more information about this process. |
| NVMe Format refused / SID BLOCKED | Your platform firmware blocked the drive’s TCG SID authentication at boot time, and some drives will then refuse their Format. The utility carries on by itself: a self-encrypting drive will receive its TCG Opal cryptographic erase whenever the drive allows it; otherwise the drive is overwritten (NIST Clear). To obtain a Purge-level result, select Turn Block SID Off at Next Start on the confirmation screen where the firmware offers it, restart, and run the erase again. Otherwise, press Sleep and try again, look for a Block SID setting in your machine’s firmware setup, or erase the drive in another machine using an M.2 slot. See TCG Block SID and NVMe Format. |
| A drive never finishes | If a drive hangs in uninterruptible I/O without ever reaching a timeout, do not reboot your system and lose all of the evidence collected for the batch. Hit Drop on that particular drive’s card (or d in the terminal interface); the rest of the batch finishes and still produces its logs and certificates. Please refer to Stopping a Drive That Will Not Finish for additional details. |
| Drive carries an HPA or DCO | There is nothing to do for a hardware erase: a Sanitize or Secure Erase operation covers all hidden sectors. A block wipe will open the hidden area where the drive allows it, and record how much it covered on the Advanced Log’s Hidden Area line. However, behind a USB bridge it is not able to reach these areas, so make sure the drive is connected to a native SATA port. |
| ATA erase interrupted: drive now locked | If an ATA Secure Erase was interrupted, the drive can be left locked with the password pmagic still set (it will not mount, shows a small capacity, or reports “security frozen”). Your drive is not dead. Simply run the Erase utility again to erase the drive: it is listed as LOCKED and erased with pmagic directly. Or, to restore the drive, run ATA Security Disable (pmagic_ata_security_disable), leave the password at its default value of pmagic, and turn security off. Please see Recovering a Drive After an Interrupted ATA Secure Erase above. |
| Verification reports Mismatch | A result of Erase Incomplete indicates that the verifier has found data that does not match an erased state, so the certificate will have a Sanitization Method value of Not completed. This typically happens when the firmware reports success for the erase operation but does not complete the full erase of the media. Refer to the Advanced Log for details about the output of the erase command. If there is another way of performing the erase (for example, ATA Secure Erase on a drive that failed ATA Sanitize verification), try that alternative. |
| Certificate not generated | ReportLab is required. Install it with: pip install reportlab --break-system-packages |
| Email not sent | mailx needs a working mail transfer agent. Check /etc/mailx.rc or sendmail. |
| Server screen goes blank at boot | This is common on rack-mounted servers that obtain their video from the management controller. Boot the Failsafe → Serial console – no video needed entry and work through your iDRAC/iLO/IPMI serial connection; erase --tui produces the same certificates as the graphical window. For more information, see Running Without a Display. |
| Logs and certificates gone after reboot | Parted Magic runs entirely from RAM. Therefore, anything written to the default location is lost upon reboot. Either use --log-dir pointed at a mounted disk or share, or set a Report server so the evidence leaves the computer while the erase is being performed. |
Network Reporting Issues
| Problem | Solution |
|---|---|
| Nothing appears on the dashboard | Verify that the address in the Report server field correctly identifies the computer running pmagic_report_server, that both computers are on the same network, and that no firewall is blocking port 8341. An empty field means reporting is turned off. When the server is started with --token, you must add the matching pmreport_token= to the client. |
| No window appears when the server starts | The graphical window requires a Linux desktop with GTK 3 available to Python. On Windows, on a Mac, or over SSH with no display, the server operates headless and prints its address in the terminal window instead; use --no-gui to force headless mode on any platform. All functionality remains accessible in the browser dashboard. |
| Session shows STALLED | The client stopped sending: a power failure, a dropped network connection, or a hard hang. Everything received prior to losing contact remains safe on the server: the drive list, every heartbeat, and every drive that had completed. Run the erase again, since an interrupted erase should never be considered complete. |
| The server was down when I erased | Nothing was lost. Anything the server did not accept was placed in a spool directory, and the results screen gives the name of the spool directory along with the command that empties it. Once the server is reachable again, run erase --report-sync SPOOLDIR --report-server HOST; it erases nothing and may be run while the results screen is still open. A spool written to RAM is lost at shutdown, just as the log files are. |
| Evidence pack fails verification | Either the pack file was modified after it was exported, or the public key does not match the server that signed it. Download the pack again and check the key against the server’s /pubkey. A pack that passes validation without --pubkey but fails with it was signed with a different key from the one you gave out. |
Get Parted Magic Secure Erase
Each option below is the complete product: Secure Erase with NIST SP 800-88r2 Purge certificates, the PM Report Server, signed evidence packs, and the offline verifier. There are no device limits, and you pay nothing per drive or per seat.
Your purchase covers unlimited machines and unlimited drives. Both the PM Report Server and the pmagic_verify offline verifier are located in the root of the ISO. There is nothing extra to pay for and nothing to install.
© 2026 Patrick J. Verner, Waupaca, WI, USA. All rights reserved.