
VisParted: The Partition Editor in Parted Magic
VisParted is the partition editor within Parted Magic. It will read from and write to both GPT and MBR partition tables directly, including the extended boot record chain, as well as an additional 8 other partition table types; it also includes reading back of the disk at completion time to verify the completed result(s) are consistent with your original plan. This version (2.3) of VisParted comes pre-installed on Parted Magic.
This page is the manual; it describes how this program functions, i.e. what each feature does, what input data is requested prior to executing the respective function, what VisParted refuses and why, the keyboard commands used in the terminal interface, using the command line, and a description of the records left behind after completing each task. These instructions have been written into the software as well. Pressing Help within the graphical window, entering ? in the terminal interface, or running visparted manual from a command line will provide these instructions.
VisParted Video Walkthrough
The 21 minutes cover all features, recorded on real drives. This includes the findings and how to fix them with just a single click, new partition tables, New, Format, Resize, Move, growing while mounted, Copy, labels and GPT names, boot sector repair, LUKS encryption, LVM, Shred, an interrupted move that was completed from its journal, the terminal version, the command line, sealed reports on the PM Report Server, and practicing on a disk image. The chapter list is on YouTube.
On This Page
- Why VisParted was written
- How VisParted works
- Before you start: the journal, and one copy at a time
- Reading the window
- The findings
- Partition operations, one by one
- The size language
- Filesystem support
- Windows and booting
- When the power fails: journals and resume
- Refusals, and what they mean
- The terminal interface
- Command-line reference
- Evidence and fleet reporting
- Practice on a disk image
- What VisParted will not do
- Under the hood
- FAQ
Why VisParted Was Written
It was originally created to address a specific problem a customer had: he cloned a Windows disk to a larger drive and needed to move the recovery partition to the very end of the disk so the system partition could grow. The tools of the time could not do it, and when he attempted to use those programs they simply failed without providing any reason as to why they failed. He then used a Windows program to finish the task. That kind of failure, with no explanation and no way to tell whether the disk was now worse off, is exactly what VisParted was created to solve.
VisParted was built from scratch around one principle: it does not report anything it has not checked. VisParted contains absolutely no source code from GParted, GNU Parted or any other partition manager, and at runtime it doesn’t link into any other project’s library. When version 2.0 shipped, which included approximately 19,000 lines of code, each line was cross-referenced against the entire source tree for both projects, resulting in zero matches. It has its own reader, writer and planner, and since version 2.0, its own FAT resizer. It has since added its own exFAT resizer, its own HFS and HFS+ shrinker, and its own readers/writers for 8 additional partition table formats; version 2.3 includes just over 40,000 lines of code.
Two rules apply throughout:
- Nothing is silent. Progress during long operations will show up on screen. If a tool stops responding, VisParted will also indicate that.
- Nothing is guessed. Anything that isn’t known is either refused or shown as unknown. A refusal always provides the exact reason via the same message in the window, the terminal and the command line.
How VisParted Works
All modifications go through the same six phases:
1. Probe: VisParted reads the disk itself
VisParted reads GPT headers, both GPT entry arrays, MBR slot positions, and the entire extended-partition chain directly, as well as BSD, Sun, SGI, Apple, PC-98, Amiga and Atari table information. VisParted reads filesystem superblock information directly, which includes ext2/3/4, NTFS, FAT12/16/32, exFAT, btrfs, XFS, linux-swap, LUKS1/LUKS2 headers, LVM physical-volume labels, BitLocker volumes and software RAID members, and creates its own allocation mapping for each filesystem based on its own metadata. All unrecognized items are sent to blkid’s low-level probe, therefore ZFS, APFS, ReFS etc. are named instead of being listed as unknown. As it reads the disk itself, it may inform you that your primary and backup GPT (GUID Partition Table) do not agree, that a file system claims to be larger than the size of its partition or that two volumes on this disk have identical identities.
2. Model: one picture of the disk
What the probe has read becomes a model: the device, the table for the device, every partition on the device with all four of their identities, every file system on the device with their actual used space, every free area on the device, and what the machine is doing with each partition at this time. The window, the terminal and visparted show all use this single model as input. Therefore, no two can differ.
3. Plan: nothing happens until you confirm
Your modification becomes an ordered plan: numbered actions, the risks of those actions expressed in simple language, and how the disk will be laid out after those actions compared to how it is currently laid out. Any destructive actions require you to enter the word yes; a click is insufficient when deleting data. The plan will also include a fingerprint of the original disk. If anything changes with respect to the original disk while this plan exists, then it will not execute.
4. Simulate: the plan is checked before it runs
Before anything is written to the disk, VisParted simulates the plan on a model of the disk to find potential overlaps of partitions, a table that could not hold the result, an extended chain that would break, or a file system asked to shrink below its measured minimum. Plans that fail this test are never offered. You can run this simulation on its own from the command line with visparted simulate.
5. Execute: journaled and resumable
VisParted will not begin while any partition touched by the plan is mounted, used for swap space, opened as a LUKS container, held by an active volume group, or open in another application (i.e., a dd imaging it, a restore writing to it); VisParted reports what holds each partition in the disk list. The only exception is a grow that the filesystem’s own driver can do while mounted (which falls under the category of Resize). All steps within VisParted write to a journal prior to executing them. When external tools execute during the process, the output appears immediately on the screen as it is produced; therefore, if you view a long running e2fsck execution it appears as though the tool is producing output rather than simply stopping and hanging. If the power fails, the journal finishes the job.
6. Verify: the disk is read back
Success of a tool is never accepted without verification. After each operation, VisParted rereads the disk using its own read code, then checks the result partition by partition against what the plan called for: the table has been made correctly from the plan, the type and size of filesystem are correct, the label exists and has not been damaged, and the identifier has been updated (if this was intended). If the disk’s contents do not meet all parts of the plan, the operation will always be shown as failed, regardless of how many tools indicated success. This catches drives that lie, tools that do nothing, and firmware that ignores a command. All actions performed during the operations have also been recorded into an evidence file within the journal.
Before You Start
Set where journals are kept, first
Before doing anything else, do this first. This should take about 10 seconds.
As Parted Magic operates completely out of memory (RAM), your entire filesystem, /home included, is wiped clean on restart. Therefore, by default, a journal that was created where the program started would be lost in the event of a power loss (which is exactly what it’s designed to protect against). To keep the journal safe in the event of a power outage, click Journal… in the device row (or press J in the terminal interface) and select somewhere that is safe from power losses: either the booting USB stick, or any disk that the current operation is not affecting. VisParted lists the filesystems that meet these requirements (they must be persistent, writable, and not on the disk being changed), mounts the one you select, and then checks there for interrupted operations from prior sessions; this is exactly what a newly booted rescue environment requires.
If there isn’t anywhere to put the journal, i.e., a single-disk computer without any removable storage devices installed, VisParted won’t block you. Instead, it identifies the implications of proceeding as a risk, displays them within the same confirmation prompt as all other risks, and continues to proceed upon acceptance: an interrupted operation will need to be redone rather than resumed. One case needs separate consent. A move whose destination overlaps its own source uses up the original as it copies, and only the journal can complete it; therefore, it also requests additional approval, via a checkbox in the dialog box, a yes entered manually into the terminal, or --accept-unresumable on the command line.
Each plan will display where its journal will reside before you commit, on the plan window itself, and show a warning if the journal is stored in RAM.
One copy at a time
Starting another instance of VisParted when there is an active version of it currently running will be denied. The name of the process holding the lock is stated in the denial message. Two different windows writing to the same partition table can lead to a corrupted or destroyed disk, as both windows could write over the partition layout that the other window is writing.
Choosing a disk
Started without an argument, the program opens whatever is attached; if you name specific devices or specific image files, it will allow you to work on only those. If you plug a new drive into your system while you are running VisParted, it will automatically appear as part of the list because the kernel has already notified VisParted about the change. The Rescan button is used to reread a disk that was previously read by VisParted. It is NOT used to find the new disk. A disk that cannot be read does not take the window down: that disk shows what is wrong with it, and the rest stay usable.
Reading the Window
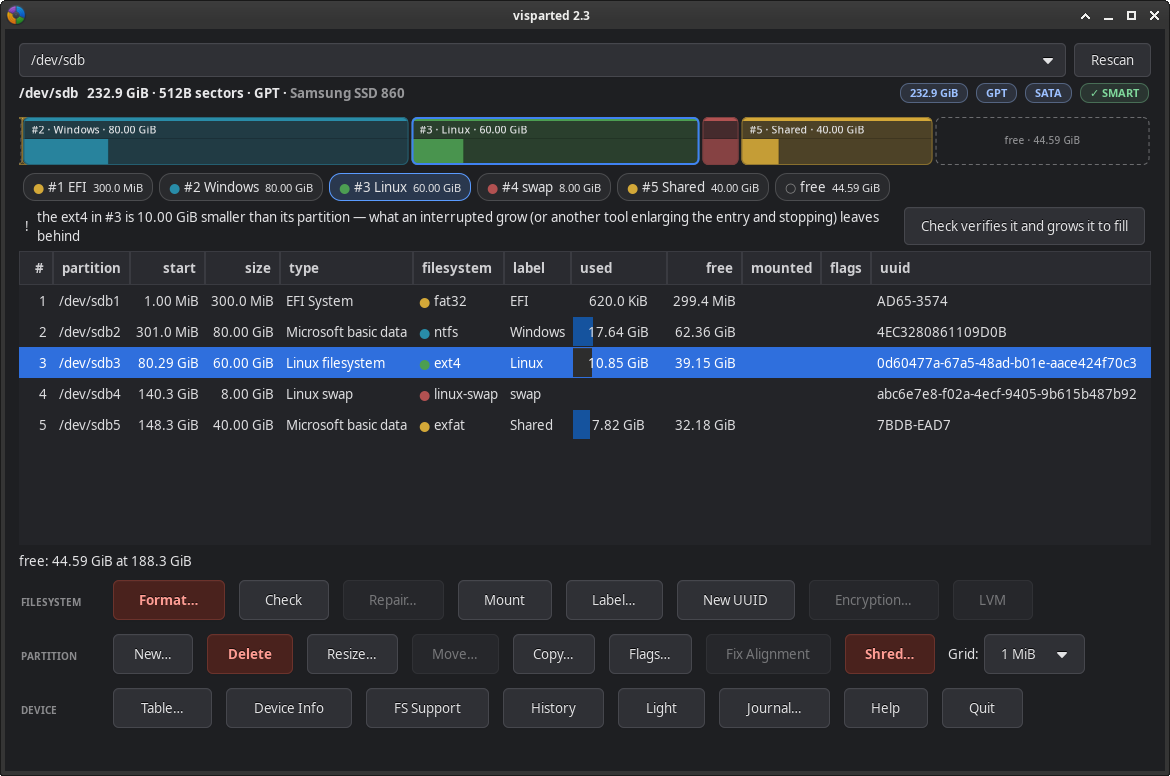
There are three ways into the same program: the window, the terminal interface, and the command line. All these interfaces will display the same messages. Below is what the window shows, from top to bottom.
| Element | What it shows |
|---|---|
| Header and badges | Device name, size, sector size and table kind, plus badges for capacity, table, bus (NVMe, USB, SATA, SD/MMC, VirtIO) and SMART health with temperature where the drive reports one. A badge that cannot be known is left out, not guessed. |
| Layout bar | One rounded segment per partition, its width in proportion to its size. The strip on top names the kind; the gauge below shows the filesystem’s used space; free regions are hollow, dashed slots labeled with their size. A partition in use says so at its right edge: mounted for a mount, in use for active swap or a device-mapper holder. |
| Chip row | A readable version of the bar: one chip per partition, readable however thin its segment is. The bar always shows true sizes, so the chips carry the labels. Click one to select it. |
| Findings brief | What the probe found wrong or costly on this disk, with the fix one click away. See below. |
| Partition table | Slot, kernel node, start, size, type, filesystem with a color chip, label, used (a bar drawn from the filesystem’s own allocation metadata), free, mountpoint, flags, and the filesystem UUID. The node column is hidden for image files, which have no kernel node to type. |
| Action groups | Actions grouped as FILESYSTEM, PARTITION and DEVICE. An action that cannot apply right now is grayed out with a tooltip saying why. |
| Theme | Dark by default; the Light/Dark button switches at once, including every open dialog. |
There are two protective measures for you when performing actions based upon the selections made. A selection is tied to a partition number rather than being a reference to a specific row position; therefore your intended partition can’t move underneath the cursor while the table redraws. And if the selected partition is gone after an operation, VisParted does NOT select anything and will tell you so, rather than placing the highlight over a neighboring partition, which is how the next action lands on the wrong partition.
The device row
| Button | What it does |
|---|---|
| Table… | Convert the partition table between MBR and GPT, or write a fresh table in any of the ten formats VisParted handles. |
| Device Info | Everything the probe read, as read: the device and its table, then every partition with its four identities (slot number, PARTUUID, PARTLABEL and the filesystem UUID), plus type, flags, size, usage and what holds it. A boot failure is usually one of those four not matching fstab, so they are shown side by side. Copy puts the whole sheet on the clipboard for a support email. |
| FS Support | What this machine’s tools can create, grow, shrink and check, per filesystem, with the missing tool named where one is missing. Grow and shrink are listed separately, because they differ. |
| History | Every action VisParted has taken on this machine, newest first. |
| Journal… | Where journals live for this session. Set it before starting work. |
| Help | The built-in manual (this text). |
| Quit | Closes VisParted. A plan window cannot be closed while its plan is running. |
The Findings
When a user opens a disk, it will be checked as well. All the things VisParted’s readers found wrong or costly are shown in plain language along with how to fix each one, prior to asking for anything. No tool runs for the findings; they come only from what the readers read. In the window they are shown below the layout bar, in the terminal they can be viewed with the ! key, and they can be printed for a support ticket by typing visparted doctor /dev/sda.
| Finding | What it means | Cure |
|---|---|---|
| A filesystem smaller than its partition | Left by an interrupted grow: the partition was enlarged but the filesystem inside it was not. | Check verifies it and grows it to fill. |
| A filesystem that says it is bigger than its partition | Usually from a clone onto a smaller disk. Mounting it can be dangerous. | Stated with its numbers so you can decide before mounting anything. |
| Two volumes with the same identity | How fstab, bootloaders and udev end up mounting the wrong one after a clone. | New UUID, on whichever one is the copy. |
| A partition that starts off the 1 MiB grid | Costs write performance on modern media; usually left by an older tool. | Fix Alignment, with the exact target offset it would move to. |
| A stale backup GPT | The primary and backup GPT disagree, so firmware may read either. | Reported as soon as it is read, not only when it blocks you. |
| A broken extended chain | An EBR link that does not lead where it claims. | Reported up front; a table this damaged is refused for planning instead of half-repaired. |
| A damaged boot sector with an intact copy | The volume reads as unknown here and as RAW in Windows, but its backup survives. | Repair restores it from the copy. |
| An MBR on a disk larger than 2 TiB | An MBR reaches 2 TiB of a 512-byte disk; the rest is unreachable. | Stated with how much it leaves unreachable; GPT reaches all of it. |
Most of the things VisParted finds will have a button next to them to fix them.
Partition Operations, One by One
Every operation below becomes a plan which you review prior to execution, and it is checked against the disk after execution. The difference in these cases is what each of these procedures asks you for and what each of these procedures refuses.
Resize
It can increase in size or decrease in size; both the file system and partition change simultaneously. The minimum possible size is measured on the actual file system by using tools available on this machine, is reported as not measurable when it cannot be measured, and will never be estimated. Each time you press a key, you are given the results: the resolved size of the partition, the change it means, a proportional bar of the result, or the reason why your entry was refused, therefore eliminating the need to guess at what values are acceptable.
If you attempt to expand into space occupied by subsequent partitions, those partitions will move, and the dialog will provide you information regarding the number of partitions that will be moved prior to committing to the operation. If you have an old CHS-style partition that does not begin on the 1 MiB grid, expanding to maximum will stop at the largest size on the grid and indicate to you how to correct the issue: Fix Alignment first, then resize, and the remaining sliver of space will be reclaimed.
While in use, a partition may be expanded by its associated file system’s driver, as long as it can grow while mounted (ext3, ext4, btrfs, XFS, JFS and NILFS2). Besides growing while mounted, btrfs and NILFS2 can also reduce in size while they are still mounted. A physical volume managed by LVM that is being used by a volume group may be grown and reduced in size using pvresize, and an open LUKS container resizes together with what is inside it (see Encryption).
A container (an MBR extended partition, an Atari XGM, an SGI volume header) is resized by changing the ending position of the container: growing out into empty space beyond it, or shrinking in to its last logical partition. Only the partition table is changed; none of the data stored in the container is relocated.
Move
The process of moving a partition is taking all of the used bytes from the old location and placing them at a new location. This is the operation that has the most to lose. Moving a partition is journaled, resumable and verified: data is written in chunks while keeping track of each chunk written. In this manner, if the process of moving a partition is interrupted (i.e., the computer is powered off), it will resume writing where it left off and not have to begin all over again nor leave a half-moved file system. Only the blocks the filesystem’s own usage map marks as used are copied, so a mostly empty 500 GB partition does not need a 500 GB read to move. Every chunk is hashed, and the hashes are checked again after the partition table is rewritten. When moving a FAT or NTFS partition, the hidden-sectors field in the boot sector is also updated so the volume still knows where it is.
The move dialog box responds to user input in real time and displays the resolved start offset, which direction the partition will move and how far, and what the layout bar will look like after the move. max means as far as it can go, whether or not that reaches the end of the drive. A partition that does not have available space next to it will not be able to be moved, and the button will say so instead of opening a dialog box with no options.
Containers are moved based on their start position only. They may move either to a position immediately in front of their first logical partition or to free space before their current position. Their end position remains unchanged along with everything contained within them.
Copy
Copying a partition copies all of a whole partition to free space on the same disk or another one, or over an existing partition, which is destroyed but keeps its place, size and table identity while the copy grows to fill it where it can grow. Source and destination are chosen in one dialog with a live preview of the destination. The source is only read and not written, even when the source and destination are on the same disk. The copy will be verified against a hash of the source taken before the copy starts. Only disks this session was opened with will be offered as targets, so a copy will only ever write to a disk you selected.
You cannot copy a filesystem that is being written to, since the copy would not be consistent, so if your source is mounted, it will be refused by name. A copy to a disk that has logical sectors larger than the units the filesystem is laid out in (a FAT, an exFAT, or a 1 KiB-block ext4 from a 512-byte disk to a 4Kn one) is also refused: it would be correct byte for byte, but the kernel could not mount it there.
New and Delete
New will create a new partition within unallocated free space of your choice, and it can be formatted at the same time. It takes care of primary partitions, extended containers, and their associated logical partitions on MBR disks (slot 5 and up), and writes out the Extended Boot Record (EBR) chain itself; it manages XGM containers and their respective logicals on Atari disks, and the boot files (#17–#31) on SGI volume headers. After the table is written, the first and last MiB of the chosen space are cleared with zeros; therefore, when recreating a previously removed partition slot using New, the prior file system will NOT be restored, and you need to use Adopt for that. The entire form validates as you type (size, type, name, file system, label); hence, if you enter a label one character too long or a size less than a file system’s required minimum, it will flag it during typing. On a device with no partition table, New will offer to write one before proceeding.
Delete will remove the slot; but the data itself isn’t touched, although as mentioned before, when you recreate the slot it zeros out the edges. If you want to kill off the data also, then you’ll need to use Shred, which can remove the slot at the same time. Deleting a logical partition on MBR will cause all logical partitions after it to be re-numbered, and because the kernel cannot re-number a partition that is in use, then while one of those logicals is in use the delete is going to be denied.
Adopt puts a partition the table no longer lists back into the table, at its original place, but does NOT write ANYTHING inside that partition. Parted Magic Rescue finds missing partitions and passes VisParted the layout (its Put back button opens the plan), which includes the location. Therefore, nothing here will attempt to guess where a partition originally existed. The plan reads the filesystem on that partition and refuses to continue if it is not the one named. The first and last MiB are hashed when the plan is made, again before anything is written and again after the partition table is written; any differences in these hash values will prevent VisParted from applying any changes. Adopt works on primaries and GPT entries only: a logical partition needs an EBR in a gap whose old position cannot be known, so logical partitions are always rejected.
Format
Writes a brand-new file system: ext2, ext3, ext4, NTFS, FAT16, FAT32, exFAT, btrfs, XFS, F2FS, JFS, NILFS2, ReiserFS, Reiser4, HFS, HFS+, UDF, MINIX, linux-swap or an LVM physical volume. It can also clear a partition by removing all file system signatures, leaving a partition with no file system while its data blocks stay as they were (use Shred to destroy them). The max length for labels varies depending upon the kind of file system; therefore, switching from one kind to another may cause your label to be longer than allowed, and VisParted tells you about the issue instead of truncating your label. VisParted writes FAT volume serial numbers itself.
When you click OK and the mkfs tool has a test mode (i.e., mkfs.xfs -N, mkfs.ext* -n), VisParted asks the mkfs tool whether it would be able to create that particular file system on that partition. Therefore, a “too small” warning is reported before the destruction warning, not after. As GParted does, before actually formatting the destination partition, VisParted removes any residual footprint left behind by the previous file system: it zeroes the first and last 512 KiB of the destination partition and btrfs’s mirror superblocks, ensuring there is no possibility of reading anything left behind from the previous file system over the newly formatted one. A tool without a test mode can only refuse when the format runs, after that clearing, and the partition then reads as empty, as the plan’s risk already said.
Check
Two steps, with the tools’ own output on screen: the first uses the filesystem’s own checker for those things it can fix; the second expands the filesystem to occupy all of its partition. The second step fixes the most common finding after cloning a disk or a half-finished resize. This tool does not have a dialog box because you do not need to make choices; the plan window is the confirmation. FAT12 volumes are read and checked just like any others, though this version neither creates nor resizes them. F2FS, JFS, HFS, HFS+, ReiserFS, Reiser4 and MINIX volumes are checked by their own checkers. An LVM physical volume is checked using pvck. An NTFS volume is checked twice: where ntfsck is installed and available, it reads the volume first and repairs only what it found, and then ntfsresize checks the result as a second, independent reader. The dirty flag of Windows is reported but never set or cleared; a volume Windows left dirty is best finished with chkdsk.
Repair
Restores an NTFS, exFAT or FAT32 boot sector from the backup copy of itself, or a damaged backup from the boot sector. Each copy is checked, nothing else on the volume is written, and what was replaced is kept in the journal. If both copies are intact but show different volumes or there is a damaged boot sector with intact copies from two filesystems because the volume was reformatted at some point, it will request which is right.
It also restores the first master file table records for Windows NTFS volumes ($MFT, $MFTMirr, $LogFile and $Volume) from $MFTMirr, or a damaged mirror from $MFT. This is useful because when these first MFT records are damaged, the volume does not mount and Windows calls it corrupted. If both the original boot sector and its backup are missing or the file system did not keep any backup (FAT12, FAT16), it will look through the entire volume for remains (the NTFS master file table or the two FATs) and write a new boot sector from those remains. It will ask first, because that search reads the whole volume. The boot sector it writes has no boot code; Windows’ bootsect /nt60 puts that back on the volume Windows starts from.
Label, New UUID, Flags, Type and Name
Label changes the name of the filesystem: the name a file manager shows, and also the name found by LABEL= in fstab. The label is saved in the filesystem, not the partition table; therefore changing the label will never format anything. How much room is left in the label, and the characters FAT and exFAT do not allow, are both checked as they are typed into the dialog box.
New UUID assigns a new ID to the filesystem; this fixes a cloned volume, and VisParted checks the ID by reading it back. This works the way GParted does it for each filesystem type. For example, JFS, ReiserFS, NILFS2, and UDF use their respective tools. However, there are filesystems such as F2FS, HFS, HFS+, Reiser4, and MINIX that do not contain an identifier that can be modified; and for FAT filesystems, VisParted writes the FAT serial number bytes itself. The plan includes a warning that anything referencing the filesystem under the old identifier (fstab entries, bootloader configurations, etc.) will stop matching.
Flags, Type and Name is what the table states regarding a partition: the MBR type byte and boot flag, the GPT type GUID, GPT attributes, and the GPT partition name; and all other formats store their own types, flags, and names. None of the data contained within the partition is accessed or altered. One change at a time: the dialog names what is pending while you work, rather than keeping one change and dropping the rest. Both type and name are validated as entered.
Fix Alignment
The smallest journaled move that returns a partition to the 1 MiB grid (a cylinder, on the formats that count in cylinders), using the same verification as every other move. The tooltip displays the exact offset it would move to before you click.
Grid: Align To
What a plan places (New, Move, Resize, Copy) goes on a grid set by the user’s choice: 1 MiB (today’s standard and the default); Cylinder (the DOS layout, where each partition starts and ends on cylinder boundaries as defined by the BIOS geometry, the first partition and each logical a track in, with the actual CHS values written); or None (any sector, unrounded). This operates like GParted’s Align to feature, on GPT and MBR disks; the other formats keep their own grid. The user chooses the grid using the Grid chooser in the window, A in the terminal or --align on the command line.
Shred
Overwrites all data in place within a partition: one pass of zeros, one pass of a seeded random stream, or one pass of random data followed by one pass of zeros. The random data is created from a seed stored in the journal, allowing the full read-back verify to recreate and validate every single byte (not simply verifying that some bytes were written). Once completed, the final step requires that there be NO filesystem present in the partition, or the step will fail. Then, if desired, the same plan can delete the now-empty slot, with one typed yes for both.
Note: overwriting is done through the block layer. Thus sectors that have been remapped by the drive itself, plus any over-provisioning areas, are not reached. If you want to sanitize an entire device, use Secure Erase.
Partition Table: Convert or Write
MBR converts to GPT and vice versa in place, where everything will fit. The entire table is then rewritten from the model. All partitions are left alone, including their data, file system, and label. Nothing within those partitions is ever read or written. Partition numbers and possibly how your disk boots can be altered by this conversion, and your plan will detail each modification prior to any write occurring.
The same button writes a new table (GPT, MBR, or one of the eight other table formats listed below) on an empty disk, on a disk that holds a single whole-disk file system, or over a table you wish to replace. Whatever existed there previously is destroyed, and your plan will ask you to type yes to continue with the overwrite. On a disk larger than 2 TiB, writing or converting to MBR says how much of the disk it leaves unreachable; GPT reaches all of it.
The Other Partition Table Formats
GPT and MBR are what most disks have. The other eight formats are the ones GParted writes through libparted. VisParted reads and writes each of them itself, laid out field for field the same way that libparted version 3.8 does, so whatever table is created by one program, the other can read.
| Format | How it is laid out |
|---|---|
| BSD disklabel | Eight slots, 64 bytes into sector 0; the type is the BSD fstype. |
| Sun VTOC | Eight slots counted in whole cylinders; #3 is the whole disk when no partition uses it. |
| SGI volume header | Sixteen slots: #9 is the volume header, the container whose logical partitions are the boot files (#17–#31, named, one of them the file it boots); #11, the whole volume, is written and not shown. |
| Apple partition map | The map is an entry of its own (#1), free space is Apple_Free entries, and every entry is named. |
| PC-98 | Sixteen slots counted in cylinders, named. |
| Amiga RDB | A chain of partition blocks counted in cylinders, named, numbered by place on the disk. |
| Atari AHDI | Four entries in the root sector (twelve in ICD mode); an XGM container holds logical partitions chained through auxiliary root sectors; numbered by place on the disk. |
| loop | No table at all: one filesystem across the device, which --part 0 addresses. |
Flags, type and name are all specific to a format: Flags provides the flags associated with a particular format (the Sun mount flags, the SGI root, swap and boot file flags, the Amiga boot and do-not-mount flags); Set Type provides a list of types by their name; and the name field exists wherever a format has one. When a format counts in cylinders (Sun, PC-98, Amiga), what a plan places starts and ends on a cylinder, the same as libparted does it. Entries a format keeps for itself (such as an Apple map’s own entry, and the SGI volume header) are never deleted or moved, and the refusal indicates which ones. An AIX label is identified and nothing more: neither VisParted nor libparted reads or writes the information contained within the label, and when creating a new table, the label will be replaced.
Except for PC-98 and SGI boot files, all formats’ partitions get device nodes assigned by the kernel. Work on those happens through a loop device that overlays the bytes that belong to the individual partition.
Mount and Unmount
The label of the button displays the state: Mount, Unmount, Swapon or Swapoff. First, the fstab of the system is checked (on Parted Magic, the mount daemon’s entry takes priority), and when no entry is found within the fstab, the daemon’s own option table is used. If an fstab entry exists that names the partition via device path, UUID=, LABEL=, PARTUUID= or PARTLABEL=, then it is honored. This applies to both GPT and MBR partitions. Because an unmount can wait until all data have been synced onto disk, mounting occurs in the background, and messages from the tool are shown on the status line.
LUKS containers that are locked and LVM physical volumes also refuse to be mounted, and suggest going to “Encryption” or “LVM”: since the file system is contained within the mapping layer, simply mounting the raw partition would be incorrect even if the kernel permitted doing so. As neither of these file systems has a driver in the kernel anymore, ReiserFS and Reiser4 also refuse to be mounted: they must therefore be operated upon using the appropriate tools while unmounted.
Encryption (LUKS)
Opens a locked LUKS1 or LUKS2 container, or locks an open one. The passphrase will be given to cryptsetup’s stdin and will never appear on a command line, in a log file, or in a journal. When you open a container, VisParted checks that the kernel lists the crypt mapping. Locking is refused while the mapping is mounted, being used as swap space or under LVM, and after the container has been locked, VisParted checks that the mapping is gone.
A partition under an open container is in use. The bar indicates it, and every destructive action will refuse it by name until it is locked. This cannot be shown solely by looking at the mount table, since the mount point will be on /dev/mapper rather than the partition itself.
The work performed on what an open container holds happens via the mapping: Check, Label, and New UUID operate directly upon the filesystem inside the container. Resize operations follow GParted’s procedure: a shrink first reduces the filesystem size inside, then changes the mapping (via cryptsetup resize), and finally resizes the partition, and a grow runs in the opposite order. Since nothing can read what is inside a locked container, a locked container grows in the table only, for its next opening to use, and it does not shrink. A LUKS2 container whose key is kept by the kernel needs its passphrase again for the resize; the plan asks for it before anything is written, and it is passed on stdin like every passphrase here.
BitLocker
A BitLocker volume is identified by its own records. The details of these records include size, encryption method used, when the volume was enabled for encryption, description and what is required to unlock the data stored within (password, recovery password, TPM). No information can be read from inside the locked volume; therefore, it is never resized here. Shrinking is not permitted (Windows shrinks it, unlocked, using Disk Management), while growing only updates the table entry with the new larger size so that Windows can extend the volume into that space. Entire volumes are copied or moved as whole units; a copy operation creates an identical volume with the same identifier, password and recovery key.
To unlock it you could open the Mount window (Unlock BitLocker) or use cryptsetup open --type bitlk. Regardless of which method you choose, once that volume is opened it will be in use, and every destructive action is refused by name until it is closed, even when the dislocker portion of the Mount window is holding onto it through a file the mount table does not have access to.
LVM
Physical volumes are read directly: the kind, the UUID of the PV, and the VG name from the live metadata. Creating a PV is a Format kind, so it carries the same destruction risk, and a typed yes, as all formats. The LVM button activates or deactivates a volume group and handles membership: create a VG on an orphan PV, add an orphan to a VG, remove a PV from a VG, or remove a complete VG. All actions are validated by both VisParted’s own reader and LVM’s own listing. Any attempt to deactivate will fail if anything is mounted. This version does not create or delete logical volumes, and it will tell you so when you attempt either. A physical volume grows and shrinks with pvresize, ending on a multiple of its group’s extent size, and deleting or formatting one says which group loses that PV and which LVs have extents on it.
Software RAID
A member of a Linux software RAID is read directly, for each version of metadata (0.90, 1.0, 1.1 and 1.2), and shown along with its array’s name and UUID. While its array is running, the member belongs to the array: it is shown as a member of /dev/mdN, and every action that would write to it is refused until the array is stopped with mdadm --stop. Members are never resized or copied on their own: they resize with their arrays, and a copy would be a second member with the first one’s identity. Once a member’s array is stopped, it may be moved (byte for byte, including the superblock), formatted, or deleted, and the plan will detail how this impacts the array: mirror and parity based arrays will continue to operate in degraded mode, while RAID 0 and linear arrays are lost. A running array, an assembled Intel RST volume included, appears in the device list and is partitioned like any other disk.
Whole devices with no partition table
Flash media and encrypted external drives often have one file system written straight across the entire device. Since there is no partition table on these devices, VisParted views them as partition 0. Mount, Encryption and LVM work on it in every interface, and --part 0 addresses it on the command line. On a disk that has a partition table, --part 0 is refused; it applies only when the device is one filesystem.
The Size Language
All prompts for sizes and offsets in the window, the terminal and the command line follow the same rules. Therefore 4 always refers to the same quantity.
| You type | It means |
|---|---|
4 | 4 GiB. A plain number is GiB, the unit partition work is usually done in. |
500m, 2g, 1t | MiB, GiB, TiB. The iB is optional: 500mib is the same thing. |
500mb, 2gb, 1tb | Decimal megabytes, gigabytes, terabytes: the numbers on the drive’s label. |
4096b, 2048s | Exact bytes; sectors at the disk’s real sector size. |
12.96g | Fractions are accepted and rounded to the nearest byte, so anything the program printed can be typed back into it. |
min, max | The measured limits. min is refused when the minimum cannot be measured on this machine. |
current | Leave it as it is; useful for undoing a half-typed entry. |
+2, -500m | Relative to the current value: grow by 2 GiB, shrink by 500 MiB. In the move dialog, slide right or left by that much. |
50% | Half of the largest reachable size. |
+10%, -10% | A tenth more, or a tenth less, than the current size. |
Partition Editor Filesystem Support
Move and copy operations are possible on all partitions. This is because they operate on blocks and on the filesystem’s own allocation map, rather than through a filesystem driver. The remaining columns depend upon which tools are available for each filesystem. Click FS Support from within the program to determine what this machine supports right now, based on the tools present.
| Filesystem | Create | Grow | Shrink | Check | Label | New UUID | Move / Copy |
|---|---|---|---|---|---|---|---|
| ext2 / ext3 / ext4 | ✓ | ✓ | ✓ | ✓ | ✓ | ✓ | ✓ |
| NTFS | ✓ | ✓ | ✓ | ✓ | ✓ | ✓ | ✓ |
| FAT16 / FAT32 | ✓ | ✓ | ✓ | ✓ | ✓ | ✓ | ✓ |
| FAT12 | No | No | No | ✓ | ✓ | ✓ | ✓ |
| exFAT | ✓ | ✓ | ✓ | ✓ | ✓ | ✓ | ✓ |
| btrfs | ✓ | ✓ | ✓ | ✓ | ✓ | ✓ | ✓ |
| XFS | ✓ | ✓ | No | ✓ | ✓ | ✓ | ✓ |
| F2FS | ✓ | ✓ | No | ✓ | No | No | ✓ |
| JFS | ✓ | ✓ | No | ✓ | ✓ | ✓ | ✓ |
| NILFS2 | ✓ | ✓ | ✓ | No | ✓ | ✓ | ✓ |
| ReiserFS | ✓ | ✓ | ✓ | ✓ | ✓ | ✓ | ✓ |
| Reiser4 | ✓ | No | No | ✓ | No | No | ✓ |
| HFS / HFS+ | ✓ | No | ✓ | ✓ | No | No | ✓ |
| UDF | ✓ | No | No | No | ✓ | ✓ | ✓ |
| MINIX | ✓ | No | No | ✓ | No | No | ✓ |
| linux-swap | ✓ | ✓ | ✓ | No | ✓ | ✓ | ✓ |
| LVM2 physical volume | ✓ | ✓ | ✓ | ✓ | No | No | ✓ |
| LUKS1 / LUKS2 | No | ✓ | ✓ | No | No | No | ✓ |
| BitLocker | No | No | No | No | No | No | ✓ |
| Software-RAID member | No | No | No | No | No | No | Move only |
A few rows require a note, because “it resizes” means a slightly different thing depending on the filesystem used:
- FAT16 and FAT32 are resized by VisParted itself. Each version prior to 2.0 would load libparted at runtime, just for this one operation. Since 2.0, VisParted does it itself and links nothing. However, there are two limits. Cluster sizes always remain unchanged, so a FAT volume can never be shrunk beyond where its cluster size will allow (shrinking further would require a reformat). Also, the resizer holds an entire allocation table in RAM, so tables larger than 256 MiB are refused by name.
- btrfs and XFS have no offline resizer, and their native commands accept a mount point rather than a device name, because they rely on the running kernel to complete the task. Therefore, for both of these file systems, VisParted mounts the volume at a private mount point, resizes it, and unmounts it again before the partition table is touched. If you attempt to use a volume that is already mounted somewhere else, VisParted will refuse to operate on it, not simply reuse it, because it cannot guarantee that it will successfully unmount a volume it did not mount.
- XFS only grows. No released version of xfsprogs can shrink an XFS file system. XFS file systems grow in whole allocation groups; as such, their final size is reported after completion of the resize rather than predicted.
- btrfs decides how far it can shrink by moving around the various chunks. The lowest size displayed is the current allocation of the volume at present time; btrfs may possibly be able to shrink it further or reach a point where it stops due to a btrfs error itself. Because VisParted can only view the device in front of it, btrfs volumes across multiple devices are also denied.
- exFAT is resized by VisParted itself too, based on the specification published by Microsoft. A shrink packs the clusters past the new end into available space below it; a grow lengthens the FAT ahead of the cluster heap, prior to moving any data. Any volume with a dirty or media-failure flag set will be refused, with the fix named: Check clears the flag and fills the partition. A TexFAT volume (a two-FAT volume) is not resized.
- The other filesystems resize with GParted’s commands: F2FS and JFS grow, and NILFS2 and ReiserFS both grow and shrink. VisParted shrinks HFS and HFS+ itself, hashing each copied extent and journaling all changes made; thus, if a shrink is interrupted, it will resume. Nothing grows HFS or HFS+. Reiser4, UDF and MINIX are neither grown nor shrunk.
- Encrypted volumes: an open LUKS container will resize together with the file system inside it. When locked, however, it grows in the partition table only, for its next opening to use. No resize operations occur on BitLocker volumes (Windows performs those while unlocked); however, a grow can give one room in the table.
Windows and Booting
The process of moving a Windows partition is simple. The difficult task is doing this in such a way that Windows will continue to start up properly, and that is what VisParted was built for.
VisParted surveys the boot chain itself. It finds the BCD stores on FAT EFI system partitions and on NTFS system partitions, and it reads the registry hive directly. From there, it determines which partitions each boot entry points to and how (either by MBR byte offset, which fails if a partition is moved, or by GPT GUID, which doesn’t). Lastly, it examines GRUB’s BIOS embedding within the gap after the MBR. Run visparted boot /dev/sda, or review the survey prior to making a decision on a move.
Once the move or copy has been made, VisParted updates the hidden-sectors field in both FAT and NTFS boot sectors so the volume knows its current location. If a BCD entry references a partition by MBR offset, VisParted is capable of patching the store in place. However, if there is no safe manner in which to perform the update, VisParted identifies which entry needs it and explains why, instead of writing a guess.
There are four identities you need to remember: a device path may break when the kernel numbers devices differently; a filesystem UUID remains unchanged after a partition is moved, but it changes as soon as you format the filesystem again; PARTUUID survives everything except rewriting the partition table; and when converting from MBR to GPT, new partition GUIDs are assigned, so PARTUUID= references stop matching while UUID= references keep working. VisParted shows all four side by side on the Device Info sheet, which is usually where a startup issue is diagnosed in seconds.
Windows 8 and up shut down using Fast Startup as the default mode, which is a type of hibernation: Windows comes back from a memory image describing your NTFS volumes as they were when you shut down. VisParted reads that state directly from each volume’s own journal, and it refuses to move, resize, relabel, re-identify or check any of those volumes, because when Windows comes back up after that, it will ruin them. Start Windows and shut it down completely (Shift + Shut down, or shutdown /s /t 0), or turn Fast Startup off, then come back. Formatting such a volume is allowed, since that destroys it regardless, and a copy of it warns that it is a copy of a volume Windows still holds.
A Windows dynamic disk manages its volumes through a database of its own that VisParted does not read or write. The partitions of a dynamic disk are displayed and named, and you can check them, label them, give them a new identifier, or repair a boot sector or the MFT. Any action that moves, resizes, creates, deletes, formats or overwrites a partition is refused by VisParted, with Windows Disk Management named as the place to complete these actions. A new partition table replaces a dynamic disk, and VisParted says so.
When the Power Fails: Journals and Resume
All runs produce a journal. This includes the plan, the beginning and ending of each step, and for a move, which chunks were actually written to disk and verified. Nothing is determined after the fact from what the disk looks like.
Boot Parted Magic again and start VisParted. After booting, VisParted finds interrupted work by itself and offers to complete it, naming what was interrupted and on which disk, so an individual who started an operation from a desktop menu and then lost power does not need the resume command. If there are multiple interrupted runs, it lists all of them.
The completion process also begins at the last verified chunk, rather than starting over, and the partition table is updated only when all the data is where the plan indicates. From the command line:
visparted resume                              # list what can be finished
visparted resume --journal /mnt/usb/journals/visparted-journal-… --commit
There are two types of work that rely on the journal, and both are identified by VisParted before you start. One is a move whose destination overlaps its own source; this type of move uses up the original while copying. The other is a FAT resize: VisParted preserves the volume’s original tables prior to its first write, then plays back all subsequent changes from the preserved copy. With a journal that will not survive a restart, a FAT or exFAT resize goes ahead with a note that an interruption could not be replayed, and that Check would be the only way to repair it.
Refusals, and What They Mean
When VisParted refuses something, it names the partition, the reason, and what would have to change, and the same message appears across all three interfaces. The refusals you are most likely to see:
| What it says | What to do |
|---|---|
| The partition is mounted, or active as swap | Unmount or swapoff; the button does both, and its label shows which one it is about to do. |
| The partition is held by an open LUKS container, or an active volume group | Lock it under Encryption, or deactivate the VG under LVM. The mount table cannot show either of these; VisParted can. |
| The smallest size could not be measured on this host | The tool that measures that filesystem’s minimum is not installed; FS Support names it. Type an explicit size, and the resizer stops rather than cut data off if it is too small. |
| No backend for this filesystem kind, or missing tools | The plan is still shown so you can read it, but it cannot run on this machine. FS Support says which tool is missing. |
| The disk changed since this plan was built | Something else changed the disk, or a previous operation completed. Read the disk again and make the plan again; VisParted will not act on an out-of-date picture. |
| This move uses up its own source and the journal will not survive a reboot | Point Journal… at a USB stick or another disk, or give the separate consent the plan asks for (the checkbox, the typed yes, --accept-unresumable), knowing that an interruption cannot be resumed. |
| The table is not usable for planning | The findings say what is broken, such as a stale backup GPT or a broken EBR chain. VisParted does not plan on a table it cannot trust, and does not half-repair it. |
| Already running | Another copy holds the lock, and the message names the process. Use the window that is already open. |
| The partition is open in another program | A dd imaging it, a restore writing to it, or the Mount window’s BitLocker unlock; the disk list names it. Let it finish, or close it. |
| Windows is hibernated on this volume (Fast Startup) | Start Windows and shut it down fully, or turn Fast Startup off, then come back. |
| The partition is a member of a running RAID array | Stop the array with mdadm --stop first. |
| Logical partitions in use would be renumbered | On MBR, deleting a logical partition, or adding one in front of others, renumbers those after it, and the kernel cannot renumber a partition in use. Unmount them first. |
The Terminal Interface
All of the tools available in the full partition editor, but in a terminal (over SSH, via a serial connection, etc.). It contains a matching screen for each window within the graphical interface; nothing is missing from it. Type: visparted tui or visparted --tui.
| Key | Action | Key | Action |
|---|---|---|---|
| ↑ ↓ | select a partition | e | resize |
| m | move | c | copy |
| n | new | d | delete |
| f | format | k | check |
| l | filesystem label | i | new UUID |
| g | flags, type and name | a | fix alignment |
| s | shred | t | partition table |
| u | mount / unmount | o | encryption (LUKS) |
| v | LVM | ! | findings brief |
| I | device info | J | journal location |
| h | history | ? | this manual |
| p | repair | A | grid (align to) |
| r | rescan | q | back / quit |
In prompts, each key press will provide the values that have been resolved based upon your actions, the change they mean, and a bar showing the result to scale. The * indicates that a partition is being used. Enter selects your current selection, while Esc will cancel your entry. If you have selected a plan that carries a destruction risk, VisParted will ask you if you want to proceed by typing yes. Passphrase prompts show a series of stars and do not store the inputted password.
Command-Line Reference
Everything has a command line version. Plans are stored in JSON format, allowing you to create a plan on one system, read it, and apply it on another, or keep it as the record of what you intended.
Looking at a disk
visparted show /dev/sda              # probe and display, integrity findings included
visparted show /dev/sda --json       # the same model, machine-readable
visparted doctor /dev/sda            # the findings brief
visparted info /dev/sda              # every partition's four identities
visparted boot /dev/sda              # survey the boot chain
visparted history -n 20              # what this machine has done, newest first
visparted manual                     # this text
Compiling a plan
The visparted plan command takes exactly one goal, works it out against the current disk configuration, prints the planned steps and the risks associated with them, and can save the plan to a file. This command will NOT write anything to the disk.
visparted plan /dev/sda --resize 2 --size min --out shrink.json
visparted plan /dev/sda --expand 1 --out grow.json
visparted plan /dev/sda --move 3 --at max
visparted plan /dev/sda --relocate-end 3
visparted plan /dev/sda --create 500g --fs ext4 --label DATA --out new.json
visparted plan /dev/sda --format 4 --fs ntfs --label Windows
visparted plan /dev/sda --copy 2 --size needed          # same disk
visparted plan /dev/sdb --copy /dev/sda:2               # across disks
visparted plan /dev/sda --check 1
visparted plan /dev/sda --new-uuid 2
visparted plan /dev/sda --fix-alignment 1
visparted plan /dev/sda --delete 5
visparted plan /dev/sda --shred 5 --pattern random-zero --delete-after
visparted plan /dev/sda --flag +boot --part 1
visparted plan /dev/sda --set-label PAYROLL --part 2
visparted plan /dev/sda --set-type "Linux filesystem" --part 2
visparted plan /dev/sda --convert gpt
visparted plan /dev/sdb --init gpt                      # a device with no table
visparted plan /dev/sda --repair-boot 2                 # boot sector from its own copy
visparted plan /dev/sda --repair-boot 2 --direction rebuild # rebuild a lost one
visparted plan /dev/sda --repair-mft 2                  # NTFS MFT from its mirror
visparted plan /dev/sda --create 10g --fs ext4 --align cylinder
visparted plan /dev/sdc --init sun                      # any of the ten formats
visparted plan /dev/sda --spec layout.json              # a whole layout, as Rescue writes it
visparted gui /dev/sda --spec layout.json               # open its plan, as Rescue's Put back does
Useful flags: --size and --at use the size language; --logical places a new partition within the MBR extended container; --align chooses the grid (mib, cylinder or none); --direction chooses which copy a repair rewrites, or rebuild; for a shred operation, you MUST give a --pattern, since there is no default for destructive operations; and if your fstab or crypttab files reference the partitions the plan touches, --fstab FILE scans them for references the plan would break.
Proving and applying
visparted simulate shrink.json                          # re-prove against the disk now
visparted apply shrink.json --journal /mnt/usb/journals  # dry run: proof only
visparted apply shrink.json --journal /mnt/usb/journals --commit
When you select the apply function, it simulates everything first and refuses to continue if the disk has been modified since the plan was made. Without --commit, it stops after checking the plan against the preconditions, before writing anything to the disk. --journal is required and indicates where the journal should be kept: somewhere that survives a reboot and is not on any disk the plan affects; --accept-unresumable says that nowhere on this machine qualifies and that you accept that. To seal a fleet report on success, enter --report-spool DIR.
Immediate verbs
LUKS, LVM and Mount functions are not considered plans (as they change nothing on the disk); therefore they execute immediately, and their results are checked against the kernel’s own state.
visparted crypt open /dev/sda --part 3      # passphrase on stdin, or prompted on a tty
visparted crypt close /dev/sda --part 3
visparted lvm activate /dev/sda --part 2
visparted lvm deactivate /dev/sda --part 2
visparted lvm create /dev/sda --part 2 --vg vg0
visparted lvm extend /dev/sda --part 3 --vg vg0
visparted lvm reduce /dev/sda --part 3
visparted lvm remove /dev/sda --part 2
Evidence and Fleet Reporting
A job that erases a drive creates a certificate for the job. Partition jobs typically leave no record whatsoever.
Each time a job completes, an evidence record is written into its journal: what was intended to be accomplished by the job, what was reported by each of the tools used, how much time each step took, and what the disk read back as afterward. This record is the primary document for the job and remains with the journal. Reporting is the mechanism through which it gets off the machine: VisParted takes the evidence in the journal and seals it within a report whose identifier is the SHA-256 hash of its own contents, such that a report can never be altered without becoming a new report, and the report is sent to your own Parted Magic Report Server. Before the server accepts the report, it checks that identifier. The server then counter-signs the stored report with an Ed25519 signature that you can verify offline.
This is ideal for a refurbishment station: machines that have no network until the job is done save their reports onto the bootable USB drive, and when a network is available, a single command transmits them. If a report is transmitted again, the server recognizes it as a duplicate, and it still counts as delivered.
visparted report build --journal JOURNALDIR --spool /mnt/usb/spool
visparted report show   /mnt/usb/spool/2026….report.json
visparted report verify /mnt/usb/spool/2026….report.json --key KEY
visparted report probe  --server https://reports.example.lan
visparted report sync   /mnt/usb/spool --server https://reports.example.lan
No server address is built in or guessed; it comes from the --server option passed on the command line or from the environment variable VISPARTED_SERVER. Tokens use the same X-PM-Token header as all other parts of Parted Magic. An optional HMAC key can provide additional tamper evidence for reports beyond the SHA-256 hash of the report itself. Machines partitioning drives in several buildings produce one auditable record, on your own hardware, with no outside account or cloud service.
Practice on a Disk Image
Disk images can be used in place of actual disks. If you open an image file with any interface, it will behave as if it were a disk that has 512-byte sectors, and all the probing, planning and checking are done in the exact same manner as they would be on a physical disk. This provides a very good learning tool for new users and a way to test an untried operation without taking risks with your data on an actual disk.
truncate -s 8G /tmp/practice.img
visparted gui /tmp/practice.img        # or: visparted tui /tmp/practice.img
Write a table. Create your partitions. Format each of them. Fill one, then shrink it. Move it. Stop the move process. The journal and resume work for a file just like they do for a drive.
What VisParted Will Not Do
These are the current limits:
- Logical-volume creation and removal arrive in a later release. Volume groups can be created, removed, extended and reduced today.
- XFS cannot be shrunk, because no released xfsprogs can shrink it. It can be grown.
- F2FS is not shrunk: resize.f2fs shrinks only in an experimental mode, which GParted does not use either. HFS and HFS+ are not grown, and Reiser4, UDF and MINIX are not resized at all; no tool does it, here or in GParted.
- BitLocker volumes are not resized: Windows resizes them, unlocked. TexFAT (two-FAT) exFAT volumes are not resized either.
- A btrfs volume spanning more than one device is not resized, because VisParted can only see the one in front of it.
- FAT12 volumes are read, checked, labeled and given new UUIDs, but this version neither creates nor resizes them.
- The FAT resizer keeps the cluster size fixed, so a FAT volume can only shrink as far as its cluster size allows; it refuses allocation tables over 256 MiB by name, and the exFAT resizer has the same limit.
- NTFS directory indexes are not rebuilt.
- A partition cannot be moved and formatted in a single plan, and a primary cannot become a logical in place.
- Partitions are not kept across a change between the other table formats, or between one of them and GPT or MBR: a new table replaces them. Only MBR and GPT convert in place.
- Shred is a block-layer overwrite. Remapped sectors and flash over-provisioning are not reached.
Each of these will be refused by name before anything is written to the disk.
Use Parted Magic Clone for whole-disk cloning, and Clonezilla for network images or multicast deployments. Use Parted Magic Rescue for locating lost partitions and retrieving deleted files; VisParted then puts the partitions Rescue finds back into the table (see Adopt, under New and Delete). Use Secure Erase to sanitize an entire device, including the sectors that a block-layer overwrite cannot get to.
Under the Hood
- Its own readers and writers. GPT, the protective MBR, MBR and extended boot records are read/written to directly by VisParted. The same applies for the BSD, Sun, SGI, Apple, PC-98, Amiga and Atari formats. Superblock of filesystems, LUKS header, LVM label, NTFS attribute, FAT entry and Windows Registry Hive are also read by VisParted. There is no parted subprocess anywhere in the program.
- Nothing linked at run time. Earlier releases would load libparted just to resize FAT16 and FAT32. Since VisParted 2.0 it does that itself, so no other project’s library is linked. Much of VisParted’s FAT arithmetic was developed using years of work by GNU Parted; while the layouts of all eight other partition table formats were read from the label modules in GNU Parted (field by field), no code from them is used. The correct commands and exit codes for the filesystem tools below were learned by examining GParted’s source. VisParted’s exFAT resizer is based on Microsoft’s published specification and has two design ideas borrowed from exfat-resize. The HFS and HFS+ shrinks are both based on Apple’s Tech Note TN1150. None of their source code was used.
- The tools it runs are run separately (i.e., independently) as individual applications, thus enabling you to view their outputs, and for VisParted to verify the results itself. These utilities include: e2fsprogs, ntfs-3g and ntfsprogs, dosfstools, exfatprogs, btrfs-progs, xfsprogs, f2fs-tools, jfsutils, hfsprogs and hfsutils, reiserfsprogs and reiser4progs, nilfs-utils, udftools, util-linux, cryptsetup, LVM2, smartmontools and eudev. Once the individual utilities have finished execution (i.e., exited), VisParted will read their exit status values and once again read the disk in order to determine what really occurred.
- Integer arithmetic throughout. Only integers; no floating-point numbers. All sector sizes from 512 bytes up to 4Kn are processed at their actual size.
- Tested on every path. The last complete suite of tests for VisParted 2.3, all 112 test phases (4,205 checks, none failed), was run using real NVMe, SATA and SAS drives along with loop devices. These included some drives which would lose or refuse writes, and others in which a disk or a journal stick was pulled during an I/O operation. In each of these conditions, VisParted had to finish correctly.
- Readable. The entire application consists of a single Python 3 file with just over 40,000 lines of code. Therefore, you can read exactly what will touch your disk.
Partition Editor FAQ
Is VisParted just GParted with a new coat of paint?
No. There is no GParted or GNU Parted source code in VisParted; for 2.0 this was confirmed through a side-by-side comparison of each project’s full source tree, and there is still no source code from any other project in it either. However, its manual does name the specifications and projects that VisParted learned from. VisParted is also built differently: GParted uses a single shared library for all of its operations, whereas VisParted reads and writes the partition tables directly and double-checks every result against the disk after completion.
What happens if the power fails during a resize or a move?
Boot Parted Magic again and run VisParted; it will look for previously interrupted work and offer to complete what was started. VisParted tracks work in chunks, so it continues from the last verified chunk rather than restarting or leaving the partition in an unknown state. A new version of the partition table will be written to the disk only once the data is where it was supposed to be per the plan. The one piece of preparation required in advance is to set where journals are kept, since a live system’s own filesystem is in RAM.
Will Windows still boot after I move or resize its partition?
VisParted updates the boot sector’s hidden-sectors field (after a partition is moved or copied), and VisParted will check out the boot chain first, so you can determine what partitions the BCD store references, and if the reference is via MBR offset, or via GPT GUID, before you commit to anything.
Can it resize btrfs and XFS?
Yes. btrfs expands or contracts, XFS expands, and mounted volumes expand/contract to fit their new size using their built-in drivers. Neither of these has an offline resizing tool, so for unmounted volumes VisParted will mount the volume at a private location with a unique path; then resizes the volume; and after resizing, it unmounts the volume and then changes the partition table. Shrinking is not possible with any released version of xfsprogs, which cannot shrink XFS filesystems, and a btrfs filesystem which spans multiple devices is refused, as VisParted can only access one of those devices.
Does it still need libparted to resize FAT?
No. All releases prior to 2.0 loaded libparted at runtime. Since 2.0 VisParted has self-contained code to resize FAT16 & FAT32 without linking anything else; also, VisParted now has self-contained code to resize exFAT filesystems. Any FAT or exFAT resize performed by VisParted includes journaling; that is, VisParted saves off a copy of the original filetable(s) before writing any data during the resize operation. If VisParted is interrupted while performing the resize operation, VisParted will replay the resize from the copy of the original filetables.
Where did the operation queue and undo go?
They were intentionally replaced. A queue will allow you to stack operations on a picture of the disk which becomes immediately inaccurate after the first operation in the queue completes, and there is no guaranteed way to undo changes to a partition table once data has been moved. Each action with VisParted becomes its own plan. This plan is simulated against the current state of the disk and journaled for resuming; however, all changes must be reviewed prior to running.
Does it need an internet connection or an account?
No. All actions are performed by VisParted offline. Reporting via fleet is an option and, if enabled, the information is sent to a report server you have installed on your own internal network, not to our servers.
Can I automate it?
Yes. All commands may also be invoked from a CLI, plans are stored as JSON files and it is possible to simulate a plan and see the results without affecting a single disk (visparted show --json gives a script the full model). The terminal interface covers interactive work over SSH or a serial console.
What hardware does it handle?
VisParted recognizes SATA, NVMe, SAS, IDE, USB and eMMC storage devices, and handles 512-byte, 512e and 4Kn sectors at their actual size. The same program will run with an old 2008 laptop hard drive using a 63-sector layout as well as with a modern enterprise 4Kn disk. An XP-era disk begins at sector 63, and moving it to a 1 MiB boundary would mean writing into the next partition. VisParted only applies alignment to anything created by a plan or moved by one, leaving all other things where they are, including the extended boot records used by each logical partition.
What about a USB stick with no partition table at all?
Any filesystem that was written directly onto a physical device is treated as partition 0. You can mount it, unlock it, activate it, or write a partition table over it, which will destroy it; the plan tells you this and prompts you to type yes.
Get the Partition Editor
VisParted is included within Parted Magic. There are no charges per seat or per drive with Parted Magic. With Parted Magic there is one license fee that permits an unlimited number of physical drives on an unlimited number of computers, and nothing is installed on the computer you work on.