Clonezilla — Parted Magic GUI Wizard
Disk Imaging, Cloning, and Network Deployment
Clonezilla in Parted Magic is a GUI wizard for the open-source Clonezilla project that handles full-disk backups, disk-to-disk copies, and network deployment to many machines at once. As a result, IT technicians and sysadmins can back up a workstation, roll out an identical image to a classroom, or recover a failed drive — all from the same bootable stick. To get started, download Parted Magic and boot from a USB drive.
Clonezilla Overview
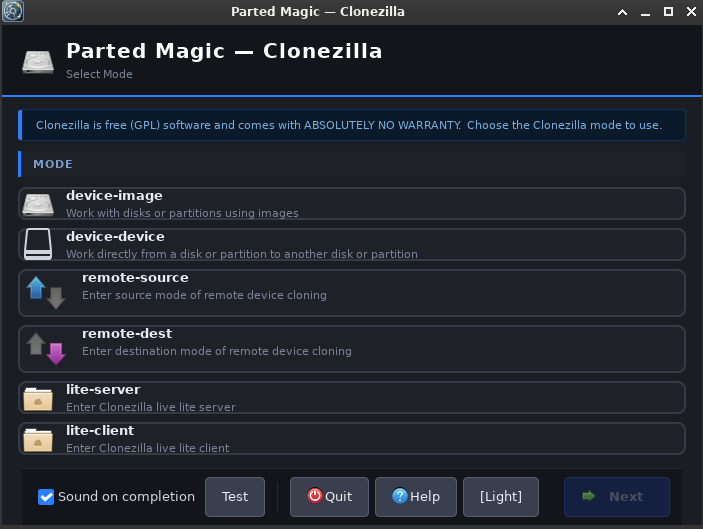
Furthermore, the upstream open-source project is a powerful disk imaging and cloning tool. In addition, Clonezilla in Parted Magic is the GUI wizard built on top of it. Specifically, it works with all six Clonezilla modes:
| Mode | Description |
|---|---|
| device-image | Save/restore disks and partitions to/from images |
| device-device | Clone a disk or partition directly to another |
| remote-source | Send a disk/partition to a remote machine |
| remote-dest | Receive a disk/partition from a remote machine |
| lite-server | Multicast an image to many clients at once |
| lite-client | Receive a multicast image from a lite-server |
Clonezilla Wizard Flow — 8 Steps
Specifically, the wizard uses a common 8-step pattern. However, steps that do not apply to the chosen mode are skipped on their own.
| Step | Name | Description |
|---|---|---|
| 1 | Mount | Mount /home/partimag (device-image and lite-server) |
| 2 | Mode | Choose Beginner or Expert mode |
| 3 | Task | Select the task type or sub-mode |
| 4 | Device | Select source and/or target disks/partitions |
| 5 | Options | Compression, encryption, restore flags, and so on |
| 6 | Confirm | Review the command and confirm |
| 7 | Run | Live output while the task runs |
| 8 | Done | Results summary and session log |
Clonezilla Mode Details
Device-Image (ocs-sr)
First, choose device-image to save or restore disk and partition images to or from /home/partimag. As a result, this is the most common Clonezilla mode for backups and restores.
Specifically, the Clonezilla wizard walks you through these steps in order: Mount, then Beginner or Expert selection, then Task, Device, Options, Confirm, Run, and finally Done.
In addition, device-image supports four tasks: savedisk, saveparts, restoredisk, and restoreparts.
Device-Device Clonezilla Mode (ocs-onthefly)
Next, device-device lets you clone a local disk or partition straight to another local disk or partition. As a result, you need no image folder at all — the data flows from source to target in one step. Furthermore, this is the fastest way to migrate to a new SSD because there is no intermediate image file.
Furthermore, this mode walks through Beginner or Expert selection, Sub-mode, Source and Destination, Options, Confirm, Run, and Done.
Moreover, the two available sub-modes are disk_to_local_disk and part_to_local_part.
Remote-Source (ocs-onthefly -a)
In remote-source mode, this machine sends a disk or partition over the network to another machine running Clonezilla in remote-dest mode. Therefore, you run both ends in tandem.
Specifically, the flow covers Beginner or Expert selection, Sub-mode, Source Device, Options for the network pipe and compression, Confirm, Run, and Done.
Remote-Dest (ocs-onthefly -s IP -d DEV)
Conversely, in remote-dest mode, this machine takes in a disk or partition from another machine running Clonezilla in remote-source mode. As a result, this is the receiving end of a remote clone job.
Furthermore, the flow covers Beginner or Expert selection, Server IP entry, Destination Type and Device, Options, Confirm, Run, and Done.
Lite-Server Multicast Deployment (ocs-live-feed-img)
In lite-server mode, the machine serves an image to many clients at once via multicast or broadcast. However, this mode needs udpcast (udp-sender) installed. As a result, lite-server is the go-to choice for mass-deploying an image to a lab or office.
Specifically, the wizard walks through Mount, Beginner or Expert selection, Client Mode, Image and Device, Deploy Options, Confirm, Run, and Done.
Moreover, the two available client modes are massive-deployment and interactive-client.
Lite-Client (ocs-live-get-img)
Finally, in lite-client mode, this machine links up to a lite-server and takes in a multicast image. Therefore, you run one lite-client on each target machine you want to image.
In short, the flow is just Server IP, Confirm, Run, and Done.
Clonezilla Mount Types
Specifically, device-image and lite-server modes use this to mount the image folder at /home/partimag. In addition, you can pick from four mount types:
| Type | Description |
|---|---|
| Local / USB | A locally attached partition (ext4, NTFS, exFAT…) |
| NFS Share | Server IP + export path |
| Samba / CIFS | Server + share + optional subdirectory + credentials |
| SSH (SSHFS) | Server + user + remote path via FUSE |
Clonezilla Beginner vs Expert Mode
Beginner
First, Beginner mode uses safe defaults on its own. As a result, only the main options show up: compression, partition table mode, fsck, and encryption.
Expert
In contrast, Expert mode gives you full control over every setting: the cloning engine, all checksum types, split image, skip flags, partition table modes, and more.
Clonezilla Compression Options
Furthermore, you can use these when saving a device-image. However, they do not apply to device-device or remote-dest modes.
| Option | Notes |
|---|---|
| None (z0) | Fastest speed, largest files |
| gzip (z1) | Fast with good compression |
| gzip-mt | Parallel gzip — uses multiple cores |
| lzo (z3) | Similar to gzip, slightly faster |
| lz4 (z8) | Very fast with moderate compression |
| zstd (z9) | Recommended — excellent balance |
| zstd-mt | Parallel zstd — the fastest and best overall |
| bzip2 (z2) | Slow but produces very small files |
| xz (z5) | Very slow but produces the smallest files |
Clonezilla Image Encryption
In addition, you can turn on encryption when saving a device-image. As a result, your image stays safe even if the backup drive gets lost or stolen. Moreover, for full-drive erasure rather than encrypted backup, see the Parted Magic Secure Erase page.
| Option | Description |
|---|---|
| Do not encrypt | No passphrase, no overhead |
| gocryptfs (-goc) | Recommended. Modern authenticated encryption |
| eCryptfs (-enc) | Legacy Clonezilla encryption |
Clonezilla Log File
Furthermore, after each run, Clonezilla writes a session log to /home/partedmagic/. As a result, you can review the full command output later:
clonezilla-YYYYMMDD-HHMMSS.logClonezilla Command-Line Usage
In addition, you can start Parted Magic Clonezilla from the command line. For example:
pmagic_clonezilla              Launch the GUI wizard
pmagic_clonezilla --test       Launch with dummy data (no real ops)
pmagic_clonezilla --deps       Check all dependencies and exit
pmagic_clonezilla --manual     Show the built-in manual
Finally, if you also need to manage the partition layout before cloning, see the Parted Magic partition editor.