Parted Magic has a self-contained USB installer in the ISO you downloaded. It is signed, and it needs nothing else to be installed. This guide will cover how to use that first; then we will discuss other tools you may have already been using (they all still work); and finally, we will cover the DVD method.
If none of this makes sense, start here: Why Your Flash Drive Won’t Boot
⚠️ Warning: Writing Parted Magic to a USB flash drive erases everything already on that drive. Back up anything you need first, and double-check you have selected the right drive.
Install Parted Magic on a USB Flash Drive
The Parted Magic USB Installer comes within the install folder of the ISO, as a build for Windows and as packages for Linux. Because it ships from the same ISO as what you are writing, you know it is always going to be the right match. Also, by shipping it directly from the ISO, you don’t have to download anything else, or evaluate anyone else’s code, or trust anyone else to do their job properly.
It removes one of the biggest choices most people get wrong when they try to make a bootable USB drive. The stick that it writes is a single FAT32 partition that will boot on legacy BIOS systems and UEFI systems with Secure Boot enabled, so you won’t have to worry about choosing between MBR and GPT. It checks every file it writes before it tells you that it succeeded at writing the ISO to the flash drive, and since the stick stays writable, Save Session works on it.
Windows: the installer is inside the ISO
Windows 10 and 11 open an ISO file by themselves. You do not need any other software.
- Double-click the
.isofile you downloaded. Windows mounts it and File Explorer opens it as a drive. (If double-clicking does nothing, right-click the file and choose Mount.) - Open the
installfolder. - Double-click
pmusb-gui.exe. Windows asks for permission, because writing to a drive requires administrator rights. Click Yes. The program is signed by Parted Magic LLC, so the publisher is named in that prompt. - Choose the Parted Magic ISO: the same
.isofile you downloaded. - Choose your flash drive from the list. Only removable drives are shown. Check the size and the model against the drive you meant.
- Click Start and confirm. Leave Verify after writing ticked: it reads every file back off the stick and compares it, which takes about a minute and makes sure the stick was written correctly.
- Eject and boot. Use Safely Remove Hardware, then start the target computer and press the boot menu key (F12, F9, Esc or Del, depending on the manufacturer; see the table below).
It typically takes two to five minutes to run on an average flash drive. However, if you prefer to avoid running it from an ISO mount, you can copy pmusb-gui.exe to your desktop and run it from that location. The application is self-contained (a single .exe) without needing an installer of its own.
Upgrading an existing stick: point it at a stick you have already written and the application will replace the current Parted Magic files on the flash drive, so you don’t need to start over to upgrade to a newer version of Parted Magic.
On Windows 7 or 8, our install application won’t work, as it requires Windows 10 or later. Users of Windows 8 or 8.1 can use Rufus below, which runs under Windows 8 and later. Windows 7 users should write the stick from another computer with a more recent operating system.
Linux: install the package from the ISO
The same install folder has a package for each of the main families. Once you’ve mounted the ISO image, install the one that corresponds to your distribution:
# use the file name of the ISO you downloaded
sudo mount -o loop,ro pmagic_26.10_2.iso /mnt
cd /mnt/install

# Debian, Ubuntu and derivatives
sudo apt install ./pmusb_*_amd64.deb

# Fedora, RHEL and derivatives
sudo dnf install ./pmusb-*.x86_64.rpm

# Slackware
sudo installpkg pmusb-*_pmagic.txz
You can find Parted Magic USB Installer in your applications menu once you’re done. Run it from your desktop (you can’t run it remotely via SSH), since it will ask for administrator access through your desktop’s own password prompt, and that prompt will never appear while logged into a remote shell.
There is also a command-line version named pmusb. This allows you to script with it, or to use it on a machine with no desktop at all. If you want to learn how to use pmusb, simply type pmusb --help. The whole source code is in the same folder, as pmusb-0.1-src.tar.gz; the installer’s license is GPL-2.0-or-later.
It fixes a flash drive dd turned into a disc
Using the dd utility (or a similar tool designed to directly write images to media without altering them in some way) to write any ISO to a flash drive will cause the entire storage medium to be converted into one read-only ISO 9660 file system. That is, a copy of a DVD that functions as if it were a DVD. A 64 GB USB storage stick will show up under Windows as a very small read-only volume; the remainder of the drive’s capacity will be unallocated. When attempting to format the storage stick under Windows, it will prompt the user to “format” the device but then refuse to complete the operation. This may result in the impression that all of your available space has been lost.
Nothing physically wrong exists with the USB device. It simply contains the old boot record and the read-only ISO 9660 filesystem at its front. Typically users have used tools such as diskpart clean or fdisk to recover their devices. While these utilities can resolve the issue, they are typically more than what most people want when creating a simple bootable device.
Point our installer at that stick and it will automatically fix it as it writes. Prior to writing any new information onto the target device, the installer will clear both the first and last megabytes of the device (i.e., the old partition table, the old boot records and any stale backup GPT header located at the end of the drive). Once cleared, it then proceeds to create a brand-new partition spanning the length of the device. At this time you should see the full capacity of your USB storage stick restored as a normal writable FAT32 formatted device. Since it is now writable again, Save Session works on it.
You do not need to manually wipe or partition the storage, or use a command line, before handing off control to our installer. Simply select the desired USB storage stick and click Start.
macOS
There is currently no macOS build of our installer. For this reason you will need to use balenaEtcher version 2.1.6 on your Mac, as described below. Although Macs with Apple silicon are capable of writing to the USB drive, you should be aware that they will NOT boot up Parted Magic. To boot Parted Magic you will need to start it from either a PC or an Intel-based Mac.
What You’ll Need to Install Parted Magic
| Item | Details |
|---|---|
| Parted Magic ISO | The .iso file downloaded from partedmagic.com after purchase |
| USB flash drive | 4 GB minimum; it will be completely erased |
| The USB installer | Already in the install folder of that ISO. Nothing to download. |
| Blank DVD | DVD-R or DVD+R disc (only for the DVD method) |
| DVD burner | Internal or external DVD writer (only for the DVD method) |
If You Prefer a Different Installer
The ISO file for Parted Magic is a hybrid ISO, which means that the tools you are familiar with will continue to write it correctly. Therefore, if you currently use a tool or workflow built around one of these options, you should be able to continue using it without having to make any changes.
Install Parted Magic on Windows with Rufus
Rufus is a free, portable application that enables users to create bootable USB drives, and it has been the long-standing way to do this on Windows.
- Download and run Rufus from rufus.ie. No installation needed; just run the
.exe. - Insert your USB drive. Rufus detects it in the Device dropdown. If several drives are connected, make sure you pick the right one.
- Click SELECT and browse to your Parted Magic
.isofile. Rufus then auto-configures the settings. - Partition scheme: choose MBR or GPT depending on the target computer (see the note below).
- Click START. If prompted, select “Write in ISO Image mode (Recommended)”, confirm the warning, and wait for it to finish.
- Eject the drive and boot the target computer from USB.
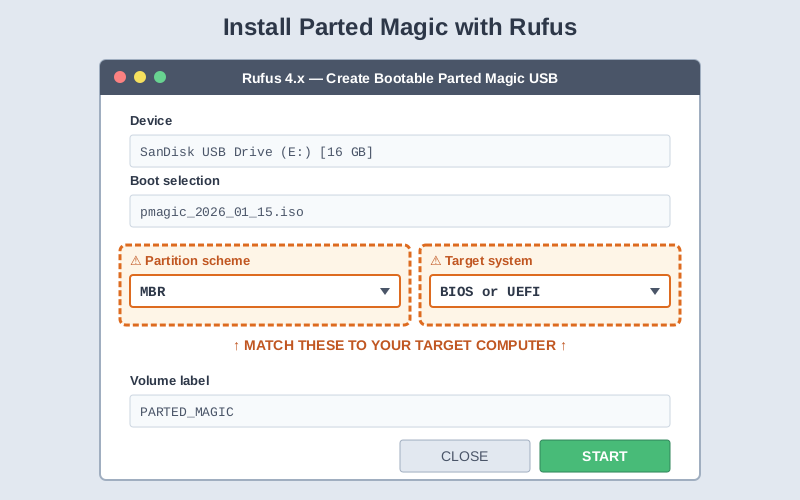
⚠️ MBR vs. GPT: the partition scheme you choose in Rufus determines what systems are able to successfully boot from the created device. MBR works on legacy BIOS systems and most UEFI firmware with CSM enabled, while GPT is supported by modern UEFI firmware. However, it will not be able to boot an older BIOS-only system. Neither one supports all computers; it will depend on the firmware of the target machine. If the created device does not show up in your machine’s boot menu, try again using the other option. It’s generally best to default to MBR if you’re unsure. Our own installer does not ask this question: the stick it writes boots on both.
Install Parted Magic on macOS & Linux with balenaEtcher
balenaEtcher is free and runs on macOS and Linux. It’s the simplest way to do this process on a Mac.
- Download and install balenaEtcher for your platform. On a Mac, use version 2.1.6 from its release page:
balenaEtcher-2.1.6-arm64.dmgfor Apple silicon,balenaEtcher-2.1.6-x64.dmgfor an Intel Mac; About This Mac shows which chip you have. Version 2.1.7 cannot open the ISO on a Mac with Apple silicon: it stops withError: (0 , h.requestMetadata) is not a function. - Launch it, click Flash from file, and browse to your Parted Magic
.iso. - Click Select target and choose your USB flash drive. Check the name and size to avoid the wrong disk.
- Click Flash!, enter your password if prompted, and wait for the write and verification to finish.
- Eject. macOS may show a “disk not readable” dialog; this is normal. Click Eject, not Initialize.
- Boot: on a PC press the boot menu key; on an Intel Mac hold Option (⌥) at startup. A Mac with Apple silicon cannot boot Parted Magic.
⚠️ Why not dd? dd will write the ISO image to the flash drive, but it will create a read-only image of the disc, so Parted Magic Save Session won’t work. balenaEtcher also copies byte for byte just like dd, so a stick that you write with balenaEtcher or dd will boot normally, but it can’t hold a saved session. Our installer, and Rufus in ISO Image mode, write a stick that can. If your current drive has been written already and is behaving like a small read-only disc, see getting it back.
Install Parted Magic with Ventoy (Multi-ISO USB)
Ventoy makes a USB drive an ISO booter. So instead of making a full USB with one ISO, you put Ventoy on it, make copies of your ISOs in that location, and choose what ISO you want to use by selecting it in Ventoy’s boot screen.
- Install Ventoy from ventoy.net onto your flash drive. This formats it with a small Ventoy boot partition and a large data partition.
- Copy the Parted Magic
.isoonto the Ventoy data partition, in the root or in a subfolder; Ventoy finds it either way. - Boot from the drive and select Parted Magic from Ventoy’s menu.
Save Session on Ventoy: Parted Magic will support Save Session when running from a Ventoy drive. It sees the Ventoy environment upon booting and recognizes the writable data partition as the place to store sessions. This means all user-created sessions are retained after rebooting, just like they would be if running off of a single dedicated stick. Ventoy works in either MBR or GPT mode and can work with multiple bootable ISOs.
Install Parted Magic from a DVD
Burn the Parted Magic ISO on Windows
Windows 10 and 11 have a built-in ISO burner, so no extra software is needed.
- Insert a blank DVD-R into your disc drive.
- Right-click the Parted Magic
.isoand select Burn disc image. If that option is missing, use Right-click → Open with → Windows Disc Image Burner. - Select your DVD drive, optionally tick “Verify disc after burning,” and click Burn.
- Boot from the disc on the target computer via the boot menu.
On older Windows versions, ImgBurn also works well: use its “Write image file to disc” mode.
Burn the Parted Magic ISO on macOS
- Finder: right-click the
.iso→ Burn to Disc… - Disk Utility: File → Open Disk Image → select the ISO → click Burn
- Terminal:
hdiutil burn /path/to/pmagic.iso
On an Intel Mac, hold C during startup to boot directly from the disc.
Burn the Parted Magic ISO on Linux
Your optical drive is usually /dev/sr0; check with lsblk | grep rom.
sudo growisofs -dvd-compat -Z /dev/sr0=/path/to/pmagic.iso

# or:
sudo wodim dev=/dev/sr0 -v -dao /path/to/pmagic.iso
Graphical options include Xfburn, Brasero and K3b: use their “Burn Image” mode. Then boot from the disc via the BIOS/UEFI boot menu.
BIOS / UEFI Boot Configuration
You don’t have to do anything but let your computer boot from the USB or DVD that you inserted. If your computer doesn’t boot automatically from the USB or DVD, then immediately upon turning the power on, press the boot menu key:
| Manufacturer | Boot Menu Key |
|---|---|
| Dell | F12 |
| HP | F9 or Esc |
| Lenovo | F12 or Fn+F12 |
| ASUS | F8 or Esc |
| Acer | F12 |
| MSI | F11 |
| Apple Mac (Intel) | Option (⌥) |
Then select the option that matches your USB drive name (e.g. “USB HDD,” “Removable Devices,” etc.) or your DVD drive.
Secure Boot: Parted Magic uses a signed boot loader, which allows it to work with Secure Boot enabled, so there is no need to turn it off. Many newer Lenovo computers are delivered from the factory with one Secure Boot setting disabled and stop at Secure Boot Violation. To enable that setting, go into your BIOS settings: under Security → Secure Boot, set Allow Microsoft 3rd Party UEFI CA to On. The support page has the details.
Verifying Your Download
To ensure that no corruption occurred while downloading the ISO file, compare the checksum listed on the download page with the checksum of the downloaded ISO file:
Windows (PowerShell):  Get-FileHash .\pmagic_*.iso -Algorithm SHA256 | Format-List
macOS:                 shasum -a 256 pmagic_*.iso
Linux:                 sha256sum pmagic_*.iso
Every release of Parted Magic is also digitally signed. Alongside each ISO file you will see its detached OpenPGP signature, named after the ISO with .asc added, such as pmagic_26.10_2.iso.asc. Import the public key from partedmagic.com/store/GPG-KEY (it also ships inside the ISO as install/GPG-KEY), and then, with your own file names:
gpg --import GPG-KEY
gpg --verify pmagic_26.10_2.iso.asc pmagic_26.10_2.iso
The signing key is RSA 4096, fingerprint F674 69C6 8A0B 8FC1 70B2 B1B5 6C49 227C 1EBA 24AD. Check that against what you imported.
Troubleshooting Your Parted Magic Install
“Another program is using the drive”
- The installer did not obtain exclusive access to the drive from Windows. Close any instance of File Explorer displaying the device, as well as everything else accessing the drive, and click Start again.
- Virus scanning software that scans removable storage devices when they are inserted may be locking up the drive for a couple of seconds once you have plugged in the drive. Wait until the scan is complete and try again.
My flash drive is not in the list
- Click Refresh after plugging it in.
- The installer lists only removable storage devices, on purpose. It prevents writing over your hard disk. Any USB SSD enclosure that reports itself as a “fixed” device will not display.
- Drives with 4096-byte sectors are refused, because the BIOS boot loader cannot address them.
USB drive not detected at boot
- Try a USB 2.0 port (black) instead of USB 3.0 (blue); they work better at boot time.
- Check that USB boot is enabled in BIOS.
- Try enabling CSM/Legacy mode if the system does not show the USB in the UEFI boot menu.
- If you used Rufus, recreate the drive with the other partition scheme (MBR instead of GPT, or the reverse). If your firmware only supports one of these options, use that option. A stick written by our own installer boots either way, so this step does not apply to it.
DVD fails to burn or verify
- Use quality media (Verbatim, Taiyo Yuden).
- Burn at a slower speed (4x–8x) for better reliability.
- Try a different burning application if the default one fails.
“Boot device not found” or blank screen
- It’s possible that you simply copied the ISO as a file rather than writing it as a disk image. You need to use a proper ISO writer. Do NOT drag the
.isoonto the target drive. - Re-download the ISO and verify the SHA-256 checksum.
Parted Magic boots but doesn’t detect a disk
- Some NVMe or RAID controllers need specific drivers. Try switching the SATA mode from RAID to AHCI in BIOS before booting.
- If that does not help, contact us via the support page.